Have you ever looked at a flickering flame and wished you could capture that amazing, dancing light on paper? It's a feeling many creative folks share, so. Fire, with its warm glow and ever-shifting nature, holds a special place in our hearts, a symbol of home and comfort, is that right? It’s truly something beautiful to behold, and getting it down with your own hands can feel like a real accomplishment.
Actually, putting fire onto a page can seem a bit difficult at first, since it doesn't really have one fixed shape or a single shade, you know? Unlike drawing a solid object, flames are always moving, always changing, which can make them quite a puzzle for an artist. But honestly, there are some pretty straightforward little tricks you can pick up that make the whole thing much, much simpler. We've put together a way of doing this that we think you'll find quite helpful, as a matter of fact.
This guide is here to walk you through the process, step by simple step, helping you create a fire that looks just like the real thing, too. We’ve put together a video that shows a time-lapse of a truly lifelike fire coming together, and we really hope this whole collection of ideas and instructions proves very useful for you. It covers everything from the very first lines to adding those bright colors and tiny little sparks that make fire truly pop, so stick around!
Table of Contents
- What Makes Drawing Fire a Little Tricky?
- What Tools Do You Need to Draw Fire?
- How Do You Begin Drawing a Single Flame?
- How Can You Bring Your Fire to Life with Color?
- Drawing Different Kinds of Fire
- Understanding Fire's Look and Feel
- Finishing Up Your Fire Drawings
What Makes Drawing Fire a Little Tricky?
You know, fire is one of those things that’s just always moving, isn't it? It doesn't sit still like a cup or a book. Flames are always shifting, dancing, and changing their appearance, which can make them a bit of a challenge to sketch out. They don't have a solid form, like a box, and their color seems to change as they flicker, too. This dynamic quality, this constant movement, is precisely what makes putting them on paper a bit of a puzzle for many people, I mean, it’s not something you can just outline easily.
Because flames lack a fixed outline or a single, unchanging color, trying to draw them can feel a little bit overwhelming. You might wonder where to even begin, or how to show that feeling of warmth and light. It's not like drawing something with clear edges, which is typically what we learn first. This absence of a definite structure is the main thing that makes fire drawing seem hard, but we've got some very simple ways to make it much easier for you to understand, as a matter of fact.
Getting Started with How to Draw Fire Basics
To get things going, it's often a good idea to start small, you know? Instead of trying to draw a huge bonfire right away, try sketching just one tiny, flickering flame first. This approach allows you to get a feel for how fire moves and looks without feeling too pressured. It’s almost like learning to walk before you run, so to speak. Focusing on a single, small flame helps you grasp the basic movements and the way light plays across it, which is pretty fundamental to how to draw fire effectively.
This simple starting point helps you understand the essence of fire’s movement and its luminous qualities. By concentrating on one small element, you can pay closer attention to the subtle changes in its shape and the way it seems to glow. It’s a bit like practicing a single musical note before trying to play a whole song. This initial practice with a lone flame will really help build your confidence and give you a solid foundation for sketching bigger, more complex fire scenes later on, and that's actually quite important.
What Tools Do You Need to Draw Fire?
You might be wondering what sort of things you’ll need to start sketching fire, is that right? Well, the good news is you don't need a whole lot of fancy equipment. You probably have most of what you'll use sitting around your house already. It's not about having the most expensive art supplies, but rather knowing how to use some pretty basic items to get some really cool effects. So, don't worry about going out and buying a ton of stuff, just a few simple things will do the trick, basically.
For this kind of drawing, the main idea is to keep it straightforward and accessible. We want you to be able to jump right into creating without any fuss. The warmth and inviting glow of fire are things you can capture with just a few common items. It’s about letting your hand create something beautiful with what you have, rather than needing specialized tools. This approach makes learning how to draw fire open to everyone, which is kind of nice, anyway.
Simple Supplies for How to Draw Fire
To get started on your fire drawing adventure, all you really need are some basic drawing materials. You’ll want a pencil, for sure, because that’s what you’ll use to put down your first ideas and shapes. A pencil lets you sketch lightly and make changes easily, which is pretty handy when you’re figuring out how a flame should look. This initial sketching phase is really important for getting the flow of the fire just right, you know?
Along with your pencil, you’ll definitely want an eraser. Mistakes happen, and that’s perfectly okay! An eraser lets you clean up any lines you don't like or lighten parts of your drawing as you go. After you've got your basic pencil sketch down, you might want to go over it with a pen and ink to make the lines stand out more. This step helps define your fire and gives it a more finished look. These simple items are really all you need to begin creating beautiful fire illustrations, so it’s pretty straightforward, really.
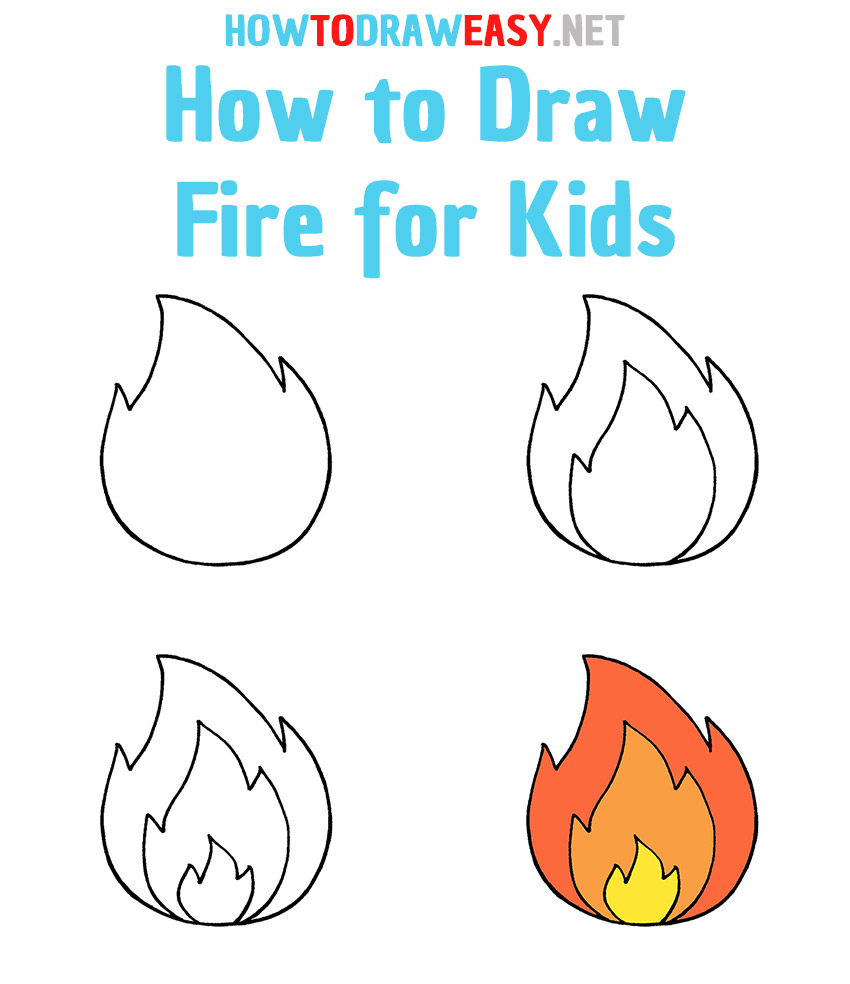
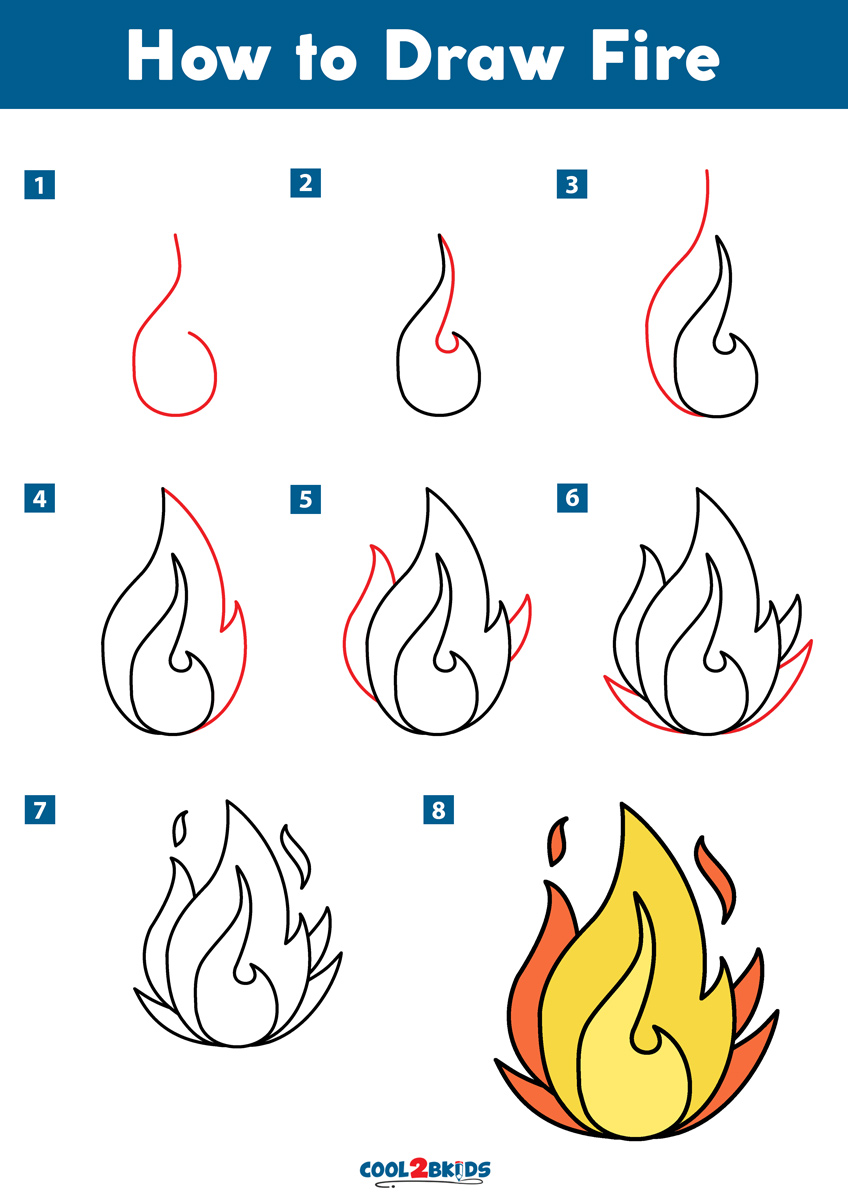
How Do You Begin Drawing a Single Flame?
When you're ready to put pencil to paper, the first thing to think about is that single, dancing flame we talked about earlier. It might seem a little odd to start with something so simple, but it’s actually the best way to get a feel for how fire moves and takes shape. You’re not trying to draw every tiny flicker right away, but rather the general flow and direction of the heat. This initial step is really about getting the overall feeling of the flame down, you know?
Think about the way a flame reaches upwards, almost like it's stretching. It's not a rigid, straight line, but rather something that sways and twists a bit. Your first lines should try to capture this gentle, upward motion, perhaps with a slight wobble or curve. This very first sketch is like the skeleton of your fire, providing the basic structure upon which you’ll build all the detail. It’s a pretty fundamental part of learning how to draw fire, basically.
Laying Down the First Shapes for How to Draw Fire
After you’ve got that initial, light outline of a single flame, you can start thinking about building up its basic shape. Remember, fire isn't a solid object, so you’re aiming for something that looks like it’s flowing and changing. You might want to think about it as a series of overlapping, wavy shapes that get narrower as they go up. This gives the fire that classic flame look, kind of like a teardrop or a leaf blowing in the wind, but with a bit more movement, you know?
As you add these first general shapes, keep your hand light. These are just guidelines, and you can always adjust them. The idea is to capture the overall volume and movement of the flame. This stage is all about getting those initial forms down before you worry about any of the smaller details. It’s a pretty good way to approach how to draw fire, making sure you have a solid foundation before adding the more intricate parts, which can be a bit tricky later on.
How Can You Bring Your Fire to Life with Color?
Once you have the shapes of your fire sketched out, the next really fun part is adding color. This is where your fire starts to truly come alive and feel warm. Flames aren't just one color, are they? They usually have a range of bright yellows, oranges, and reds, and sometimes even a hint of blue or white right at the hottest part. Thinking about these different shades and how they blend is pretty important for making your fire look real, you know?
You’ll want to start with the brighter, lighter colors in the middle of your flame, where it’s hottest, and then gradually add darker, cooler tones as you move towards the edges. This creates a sense of depth and heat. It’s a bit like painting a sunset, where colors shift smoothly from one to the next. Getting these color transitions right is a pretty big step in making your fire look believable and vibrant, so take your time with it, basically.
Adding Brightness and Spark to How to Draw Fire
Beyond just the main colors, there’s another element that truly makes fire feel dynamic: the little sparks. These are tiny flecks of light that seem to float up from the main flame, almost like little stars. Adding these can really give your drawing a sense of movement and energy, making it feel less static and more alive. They’re a pretty small detail, but they make a very big difference in the overall look of your fire, you know?
To create these sparks, you might use a very light touch with a bright color, or even a tiny bit of white. They should be scattered around the top and sides of your main flame, giving the impression that bits of glowing energy are rising into the air. This attention to small, bright details, along with blending your colors smoothly, is what really helps your fire drawings pop and feel truly radiant. It’s an important part of learning how to draw fire that many people overlook, actually.
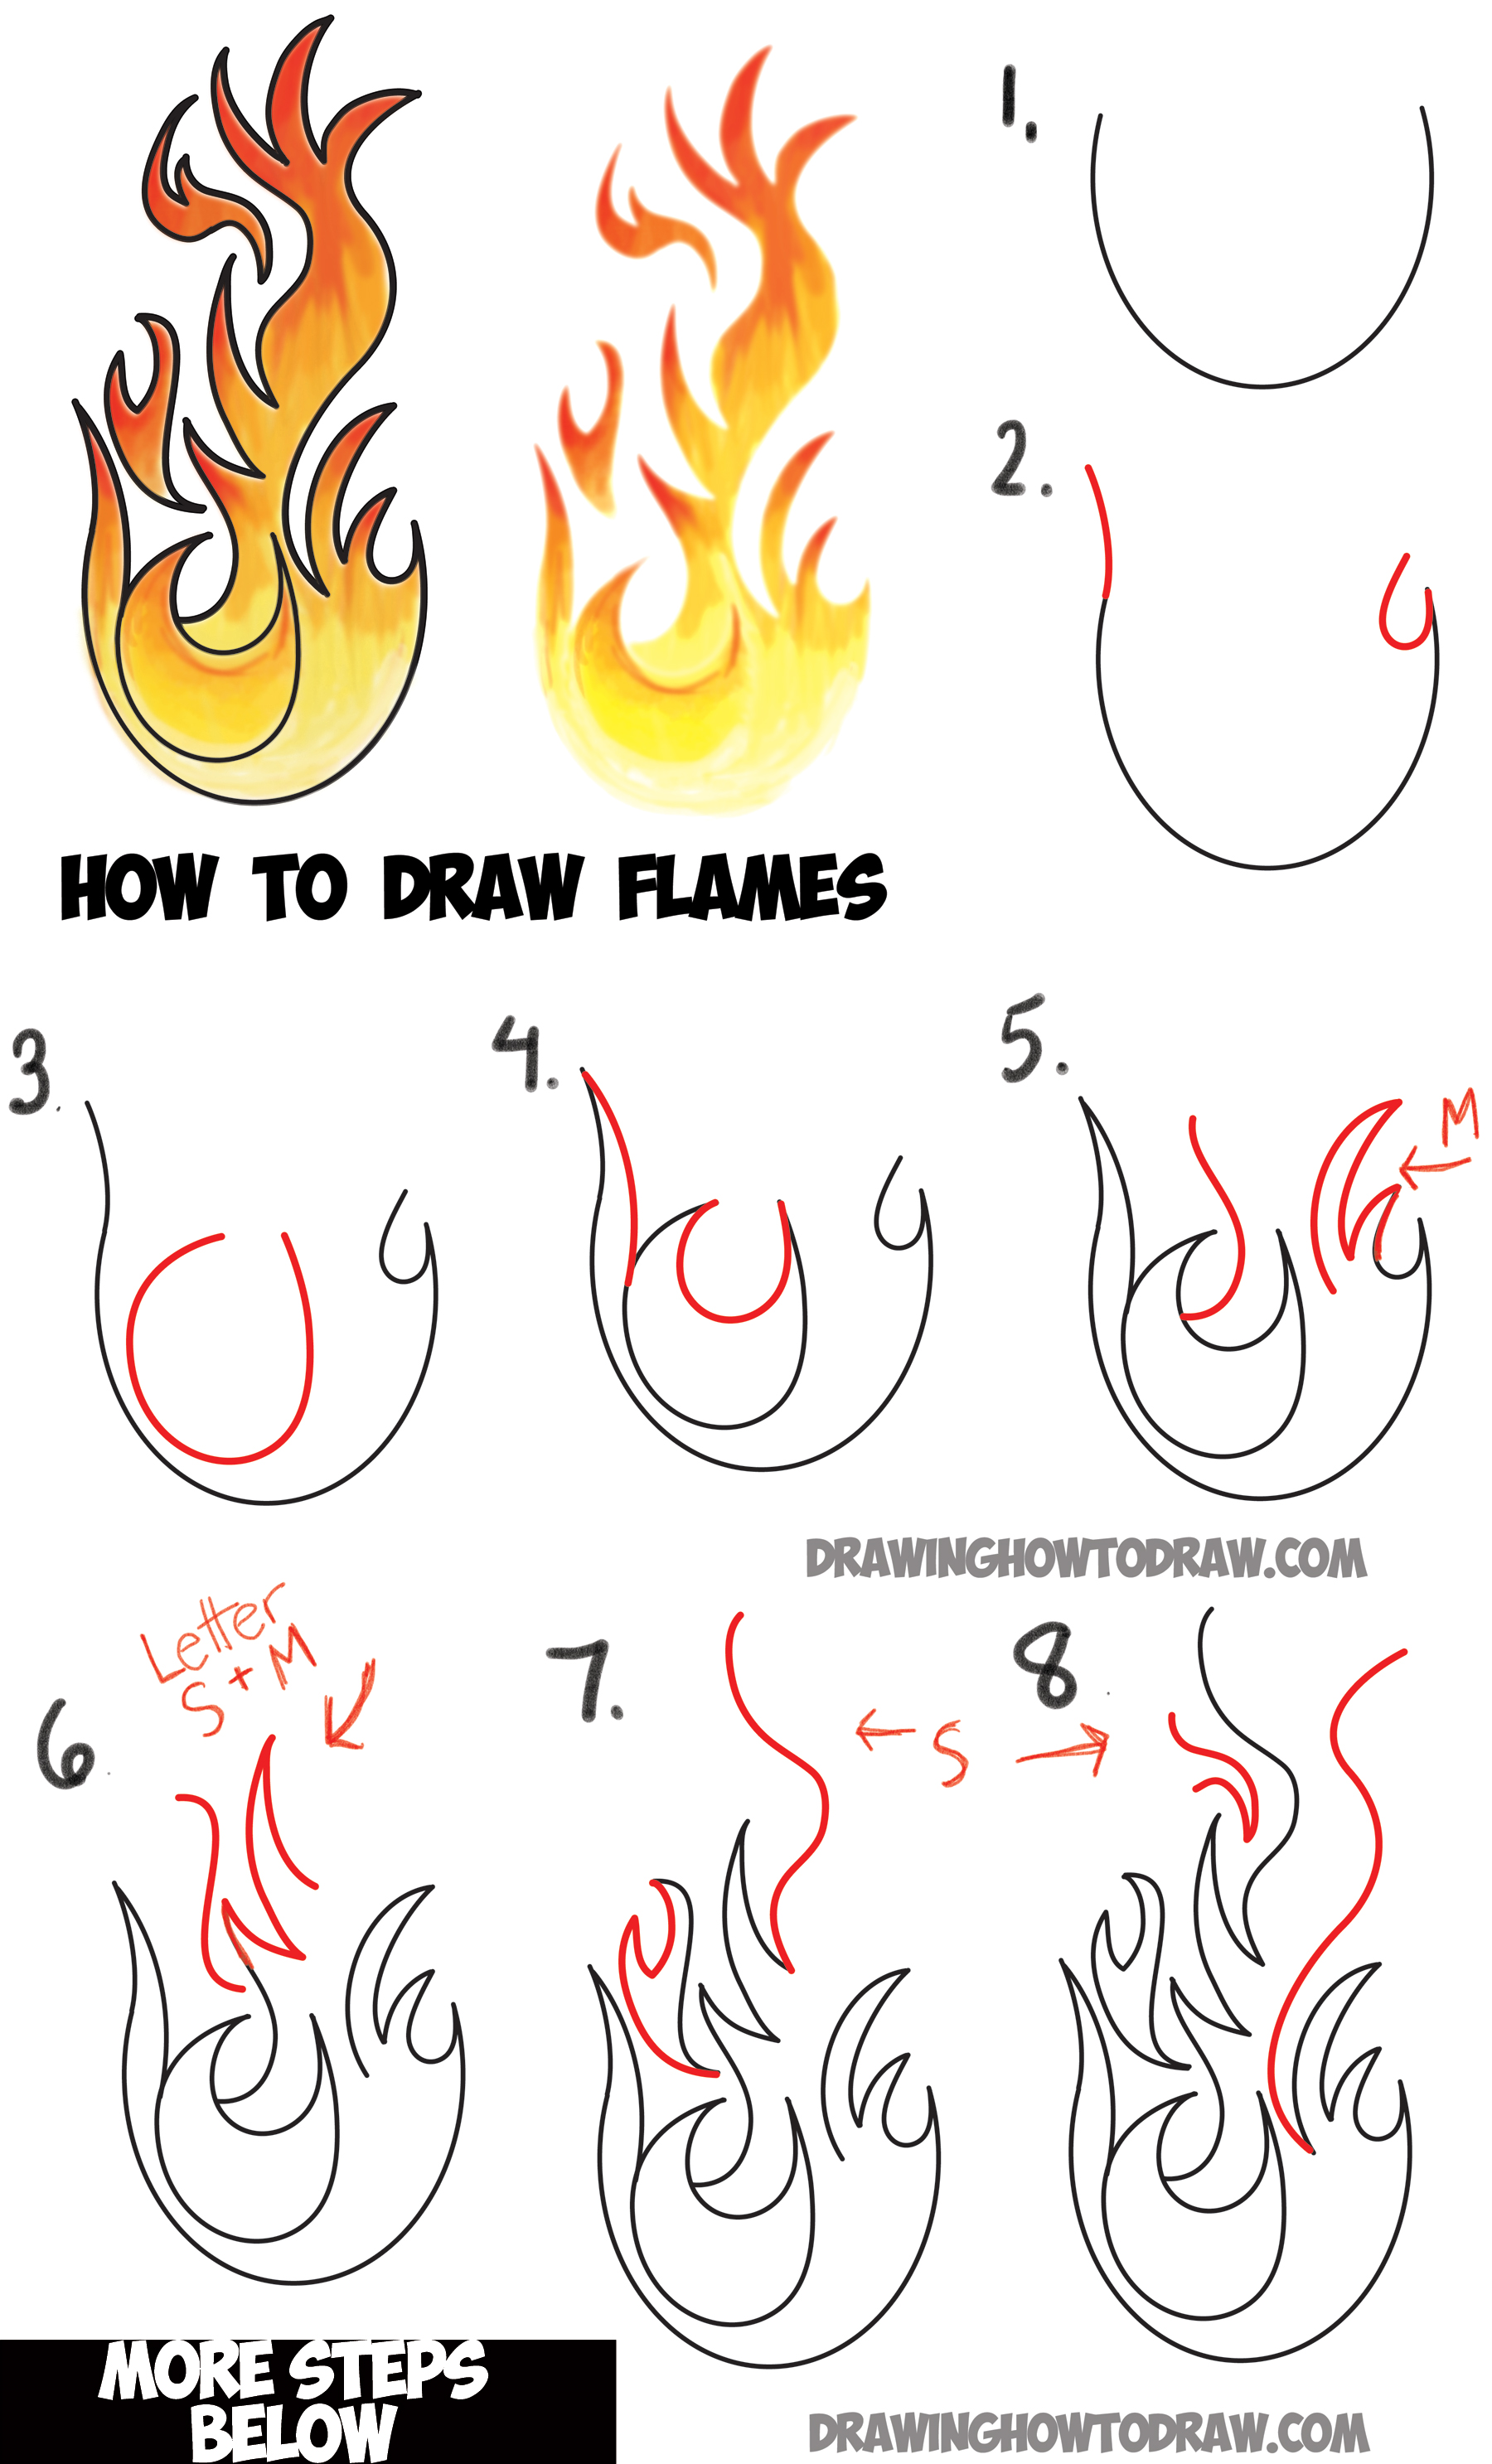
Drawing Different Kinds of Fire
Fire isn't just one thing, is it? A tiny candle flame looks very different from a big, crackling campfire, and even a thrown flame, like from a torch, has its own unique character. Each type of fire has its own shape, its own way of moving, and its own interaction with the light around it. Learning to draw these different kinds of fire can really broaden your artistic skills and give you more options for your creative projects, you know? It’s pretty interesting to see how they differ.
This guide will show you how to tackle a few common forms of fire, helping you understand what makes each one special. We’ll look at the subtle differences in their appearance and how to capture those on paper. It’s about observing the world around you and translating those observations into your art. By understanding these variations, you’ll be much better equipped to draw any kind of fire you come across, which is pretty cool, honestly.
Exploring a Candle Flame for How to Draw Fire
A candle flame is often seen against a dark background, which makes its soft, inviting glow stand out even more. When drawing a candle flame, think about its gentle, elongated teardrop shape. It usually has a very bright, almost white or pale yellow center, which gradually fades into warmer oranges and reds as it moves outwards. The base of the flame, right above the wick, is often a very deep blue or purple, which is kind of neat, you know?
The key to a good candle flame is showing its delicate nature and its transparency. It’s not a solid block of color, but something that seems to shimmer. You’ll want to make sure your colors blend smoothly, giving it that soft, ethereal look. This type of flame is all about warmth and coziness, so try to capture that feeling in your strokes. It's a very peaceful subject for how to draw fire, basically.
Capturing a Campfire for How to Draw Fire
A campfire, on the other hand, is usually seen against a lighter background, like the night sky, and it’s much more dynamic than a candle flame. Campfire flames are often bigger, more erratic, and have a lot more movement. They’ll twist and turn, sending up sparks and smoke. When you're drawing a campfire, you'll want to show that wilder energy, you know? It's not just one flame, but many flames dancing together, which is pretty cool.
Think about the different heights and shapes of the individual flames within the fire. Some might be tall and thin, while others are wider and more rounded. You’ll use a lot of bright, fiery colors here, with plenty of yellows, oranges, and deep reds. The interaction of these flames with the surrounding light and the smoke they produce is also important to consider. Capturing this lively interaction is a big part of learning how to draw fire in a more complex setting, too.
Sketching a Thrown Flame for How to Draw Fire
A "thrown flame," like from a torch or a fire-breather, presents a different kind of challenge. This type of flame is often depicted with a sense of speed and direction, almost like it’s being propelled through the air. It’s not just flickering upwards; it’s moving with purpose, which is kind of interesting. You’ll want to convey that sense of motion in your drawing, you know?
The shape of a thrown flame might be more elongated and streamlined, perhaps trailing off at the end to show its movement. The colors might be very intense at the point of origin, then gradually lessen as the flame spreads out. You’ll also want to think about how the air currents affect its shape, making it bend or twist. Capturing this active, directional movement is a unique aspect of how to draw fire that’s in motion, which can be a bit more advanced but very rewarding, too.
Understanding Fire's Look and Feel
No matter what kind of fire you're drawing, there are some basic things about fire itself that are really helpful to keep in mind. Fire isn't just about color; it's about how light moves through it, how transparent it seems, and what its overall shape is. Getting a good grasp of these elements will make all your fire drawings look much more convincing and lifelike, you know? It’s like understanding the very nature of what you're trying to put on paper, which is pretty fundamental.
This deeper understanding helps you go beyond just copying what you see and allows you to truly create the illusion of a glowing, warm flame. It’s about observing how real fire behaves and then translating those observations into your artistic choices. By focusing on these core characteristics, your ability to create compelling fire scenes will really grow, which is actually quite rewarding for any artist, so.
Getting the Shape and Light Right for How to Draw Fire
The shape of fire is never static; it's always in flux, which is why it can be a bit tricky. However, there are general patterns to its movement. Flames typically narrow as they rise, forming a kind of wavy, irregular spire. When you’re drawing, try to capture this organic, flowing shape, rather than making it too stiff or symmetrical. It’s about letting your hand move freely to show that natural dance, you know?
Transparency is another key aspect. Fire isn't completely opaque; you can often see through parts of it, especially at the edges or where it’s less intense. This means you’ll want to use lighter, more blended colors in some areas to suggest this see-through quality. And then there's the interaction with light. Fire is a light source, so it illuminates everything around it. Think about how the fire itself glows and how that glow affects the objects nearby, casting warm light on them. This interplay of light is pretty important for making your fire feel real and vibrant, too.
Finishing Up Your Fire Drawings
After you’ve put down your initial shapes, added your colors, and thought about the light, there are always a few final touches that can really make your fire drawing shine. It’s like putting the last little bit of seasoning on a meal; those small additions can really bring everything together. These finishing steps help refine your work and give it that polished look, making it feel complete and ready to show off, you know?
This last stage is about stepping back and looking at your drawing as a whole. Do the colors blend well? Does the fire look like it's moving? Are there enough bright spots and little sparks? These are the kinds of questions you can ask yourself to make sure your fire looks as good as it possibly can. It's the moment where all your efforts come together into a truly captivating piece of art, which is pretty satisfying, actually.
Polishing Your How to Draw Fire Creations
To really polish your fire drawings, you might go back in with your pencil or even a fine pen to add some subtle details to the edges of your flames. This can help define their shape a little more without making them look too rigid. You could also add more layers of color to build up the intensity in certain areas, making the fire seem even brighter and hotter. This layering helps create a sense of depth and vibrancy, you know?
Finally, consider the background. Even if it's just a simple dark or light area, how the fire interacts with it can make a big difference. A dark background will make your bright flames pop even more, while a lighter one might require more contrast in your fire