Have you ever looked at a blank piece of paper, wanting to sketch a person's face, but feeling a little unsure where to begin? Maybe you've tried before, and the results weren't quite what you pictured. It's a common feeling, you know, because getting a human head just right on paper can seem a bit tricky, especially when someone is looking in a particular direction or their head is tilted. But honestly, it's a skill that anyone can pick up, and it's less about some special talent and more about knowing a few helpful approaches.
You see, creating a likeness of a person's head from various viewpoints, no matter how unusual the angle might seem, is something we can definitely walk you through. This guide, as a matter of fact, is here to help you get that artist's touch when sketching someone's face, making it look natural and full of life. It's about breaking down what appears to be a complex task into manageable, understandable parts, so you can build confidence with every line you put down.
What we'll do here, then, is share some practical ways to approach drawing heads, from the very first shapes you put on the paper right up to adding those defining features. We'll explore methods that artists have used for ages, which, you know, really simplify the whole idea of getting proportions and angles correct. By the time we're done, you'll have a much clearer idea of how to approach this aspect of art, feeling, you know, more ready to create your own expressive faces.
Table of Contents
- Getting Started - How to Draw a Head with Basic Shapes
- Why Begin with Simple Forms when Learning how to draw a head?
- The Loomis Method - A Way to Understand how to draw a head
- Can the Loomis Method Really Help you how to draw a head from any angle?
- Adding Details - How to Draw a Head's Features
- What Are the Key Proportions for how to draw a head?
- Is Learning how to draw a head a Skill for Everyone?
- Practice Makes Perfect - How to Draw a Head Consistently
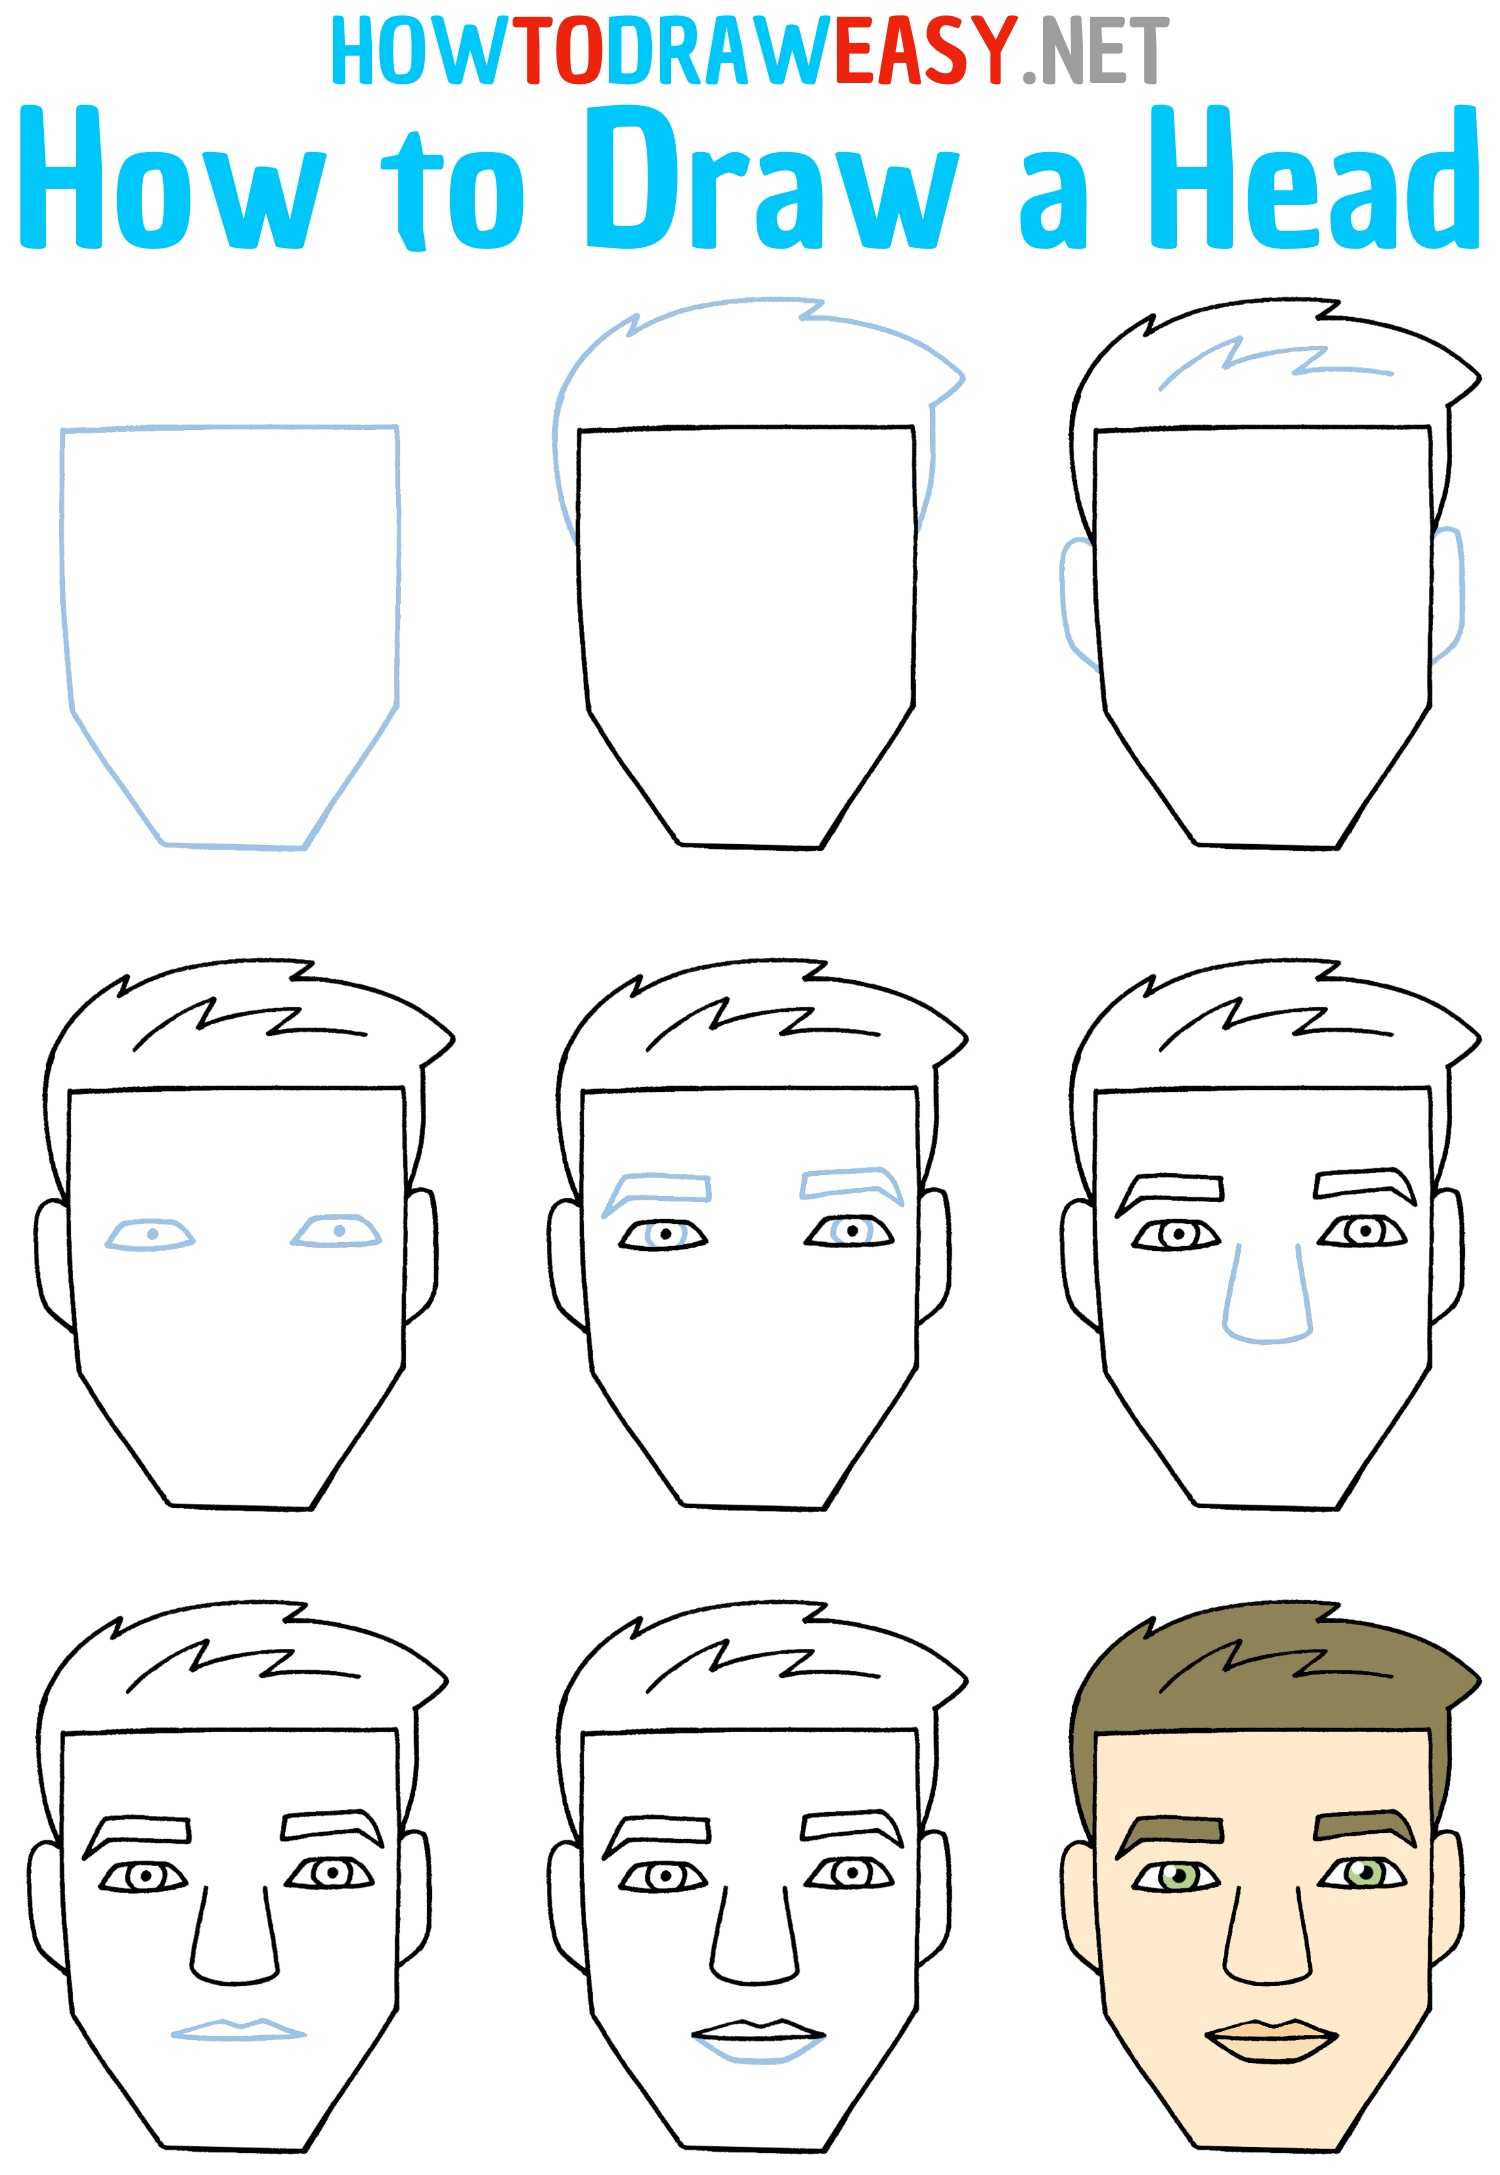
Getting Started - How to Draw a Head with Basic Shapes
When you're just starting out, or even if you've been sketching for a while, the idea of drawing a person's head can seem a bit much. Where do you even put the first mark? Well, a really helpful way to begin, you know, is by thinking about simple geometric forms. Instead of trying to sketch every curve and line right away, we start with something much more manageable. This helps lay down a solid foundation, which is pretty important for anything you build, isn't it?
So, to get going, you can begin by sketching out three oval-like forms. There's one larger shape, which sort of acts as the main part of the skull, and then you'll add two smaller ones. These smaller shapes are placed on either side of the larger one, typically near where the ears would be. This method, you see, gives you a basic structure, a sort of framework, that you can then build upon. It's almost like putting up the skeleton of a building before adding the walls and windows, giving you a clear sense of the overall form and where everything else will eventually go. This simple start helps you, in a way, get the general placement down before worrying about the tiny bits.
Why Begin with Simple Forms when Learning how to draw a head?
You might wonder why we bother with these simple shapes first when trying to figure out how to draw a head. Honestly, it makes the whole process a lot less intimidating. Imagine trying to sculpt a detailed statue without first making a basic armature; it would just fall apart, wouldn't it? Similarly, these initial shapes provide a sturdy base for your drawing. They help you establish the overall size and general tilt of the head on your paper, which is, you know, really quite important for getting the whole picture to look right.
By starting with something simple, you can easily adjust things like the angle or the size without having to erase a lot of detailed work. It's much easier to move a simple oval around than to redraw an entire face. This method also helps you think about the head as a three-dimensional object, rather than just a flat image. You begin to understand its volume and how it sits in space, which is pretty useful for making your drawings look more real. This approach, basically, sets you up for success, allowing you to build up your drawing in logical steps, ensuring that your foundation for how to draw a head is sound.
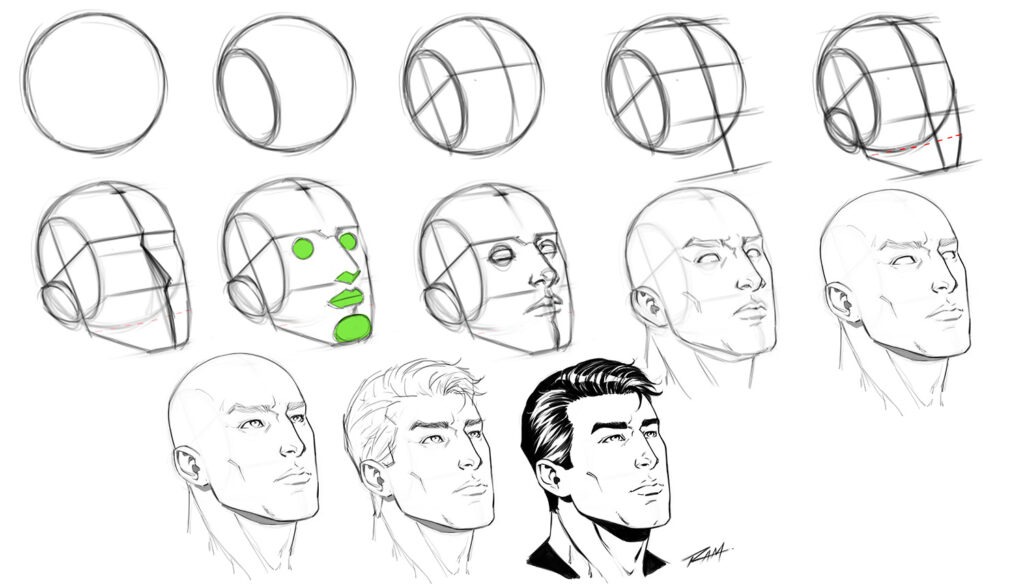
The Loomis Method - A Way to Understand how to draw a head
Now, if you're serious about creating a precise depiction of a person's head from any viewpoint, there's a well-known approach that many artists swear by. It's called the Loomis system, named after Andrew Loomis, who was a pretty influential art instructor. This method is, in essence, a structured way to think about the head as a sphere with planes for the sides, which helps you place features accurately, no matter the angle. It’s a bit like having a consistent blueprint for every head you draw, which is, you know, incredibly helpful for consistency.
The Loomis system, basically, begins with a ball shape to represent the cranium. From there, you add a flat plane for the side of the head, and then you use guide lines to map out where the eyebrows, nose, and mouth will sit. It’s all about starting with basic shapes, helpful lines, and correct sizing before adding in the individual parts of the face. This way of working, you see, allows you to "construct" the head in a logical manner, rather than just copying what you see. It gives you a framework that you can adapt for different head types and expressions, which is pretty neat. This system, in a way, provides a consistent set of tools for how to draw a head, making it less of a guessing game.
Can the Loomis Method Really Help you how to draw a head from any angle?
You might be wondering if this Loomis system truly helps with drawing a head from every possible angle. And the answer, honestly, is a resounding yes. Because it starts with a three-dimensional concept—the sphere and its planes—it naturally allows you to rotate that conceptual head in your mind. This means you can visualize how the features would shift and appear shorter or longer depending on whether the head is looking up, down, or to the side. It's not just about drawing a flat picture; it's about building a form in space.
For instance, if a head is tilted downwards, the Loomis method shows you how the eye line would curve, or how the chin would recede. If it's looking up, you'd see more of the underside of the chin and less of the forehead. This system, in fact, provides a consistent framework that helps you predict how the head's various parts will look from different viewpoints. It really takes the guesswork out of complex poses, making the task of how to draw a head from any angle much more approachable. It's almost like having a mental model that you can spin around and draw from, which is pretty cool.
Adding Details - How to Draw a Head's Features
Once you've got that solid foundation down, perhaps using the Loomis system or your own variation of basic shapes, the next step is to begin adding the specific parts of the face. This is where the head really starts to come alive, you know. But it's not just about drawing eyes, a nose, or a mouth wherever they fit. There's a method to it, based on how these features are typically positioned in relation to each other and the overall shape of the head. It's about making sure everything looks harmonious and natural.
So, after you've established your main head shape and your guiding lines—like the centerline of the face and the lines for the eyebrows, nose, and mouth—you can start to sketch in the individual features. For example, the eyes usually sit about halfway down the head from the top of the skull to the chin. The bottom of the nose is typically halfway between the eyebrow line and the chin. And the mouth, well, that's often about halfway between the nose and the chin. These are general rules, of course, but they give you a really good starting point for how to draw a head with believable features. It's almost like following a recipe, which helps ensure a good outcome.
What Are the Key Proportions for how to draw a head?
When you're trying to figure out how to draw a head, getting the sizes right, or the "proportions," is really quite important for making your drawing look like a real person. Think of it like this: if the eyes are too big or the nose is too small, it just won't seem right. There are some general guidelines that artists have used for ages to help with this, and they're pretty simple to remember, too. These guidelines help you place everything in its correct spot on the face, giving your drawing a sense of balance and realism.
For example, as we just mentioned, the eyes usually sit right in the middle of the head, from the top of the skull down to the chin. Then, the space from the eyebrow line to the bottom of the nose is often about the same length as the space from the bottom of the nose to the chin. Also, the width of the head is typically about two-thirds of its height. And, you know, the space between the eyes is usually about the width of one eye. These little rules, basically, help you make sure that when you're working on how to draw a head, all the parts fit together nicely, creating a believable human likeness. It's almost like a secret code that makes faces look right.
Is Learning how to draw a head a Skill for Everyone?
You might be wondering if getting good at making the shape of a head is something only a select few can do, or if it's a knack for making things that both new learners and seasoned creators can pick up. The honest truth is, it's very much for everyone. Whether you've never picked up a pencil to draw a face before, or you've been sketching for years, the fundamental steps for shaping a head can be picked up quite readily, in just a few simple moves. It's not some magical ability; it's a process that can be learned and practiced.
Think about it: every artist, no matter how famous or skilled they are today, started somewhere. They all learned the basic building blocks. The beauty of learning how to draw a head is that it relies on principles that are consistent. Once you grasp these principles, you can apply them again and again, refining your approach each time. It's less about being born with a gift and more about consistent effort and understanding the underlying structure. So, yes, absolutely, it's a skill that anyone with a bit of patience and a willingness to practice can develop. It's pretty democratic, really, in that way.
Practice Makes Perfect - How to Draw a Head Consistently
Like with anything new you try to learn, getting really comfortable with how to draw a head means spending some time putting pencil to paper. It's not just about reading about it; it's about doing it. The more you sketch, the more your hand gets used to the motions, and your eye becomes better at seeing the shapes and proportions. It’s almost like learning to ride a bike; you can read all the instructions, but until you actually get on and try, you won't truly get the hang of it.
So, what does consistent practice look like? Well, it means trying to sketch heads from different angles, perhaps using photographs or even looking at people around you. You can try to apply the Loomis system again and again, seeing how it helps you build the head from various perspectives. There are often straightforward practice sheets available, which, you know, can make the whole process of figuring out human body structures a lot less complicated. These kinds of resources provide guided exercises that simplify the learning. And if you find yourself wanting more, there are often follow-up resources, perhaps a second sheet focusing just on face studies, which can really help you refine your approach to how to draw a head. The key is to keep at it, because every drawing helps you improve, even the ones that don't quite turn out how you hoped.
This guide has walked you through the core ideas for sketching human heads from various angles, even those that seem a bit challenging. We covered how starting with simple oval forms can lay a solid groundwork for your drawing. We also looked at the Andrew Loomis method, explaining how this structured approach helps you build an accurate head from any viewpoint by using basic shapes, helpful lines, and correct sizing before adding in the individual parts of the face. We discussed that getting good at making the shape of a head is a skill that both new learners and seasoned creators can pick up, and that the fundamental steps for shaping a head can be picked up quite readily, in just a few simple moves. Finally, we touched on how consistent practice, perhaps with the help of easy-to-follow practice sheets, can truly simplify the process of learning how to draw human anatomy, helping you master the art of drawing the human head from any direction.