Get ready to bring a little bit of sunshine and sandy beach vibes right onto your paper, because learning to draw a palm tree is something truly enjoyable. It's almost like taking a mini vacation, just with a pencil and some paper. You can, you know, make your art feel like a warm, breezy day, no matter where you are.
Drawing a palm tree, you see, is pretty much a fantastic way to give your artwork that lovely tropical feel. It’s a very common sight in warmer spots, and it adds a certain kind of calm and relaxation to any picture. This guide, as a matter of fact, is here to help you put that feeling down on paper.
This guide, you see, is here to show you just how simple it can be, whether you're a little person or a grown-up just picking up a pencil. It’s something that, honestly, anyone can do. We'll go through it bit by bit, so you can make your very own good-looking palm tree picture.
Table of Contents
- What Do You Need to Start Your Palm Tree Drawing?
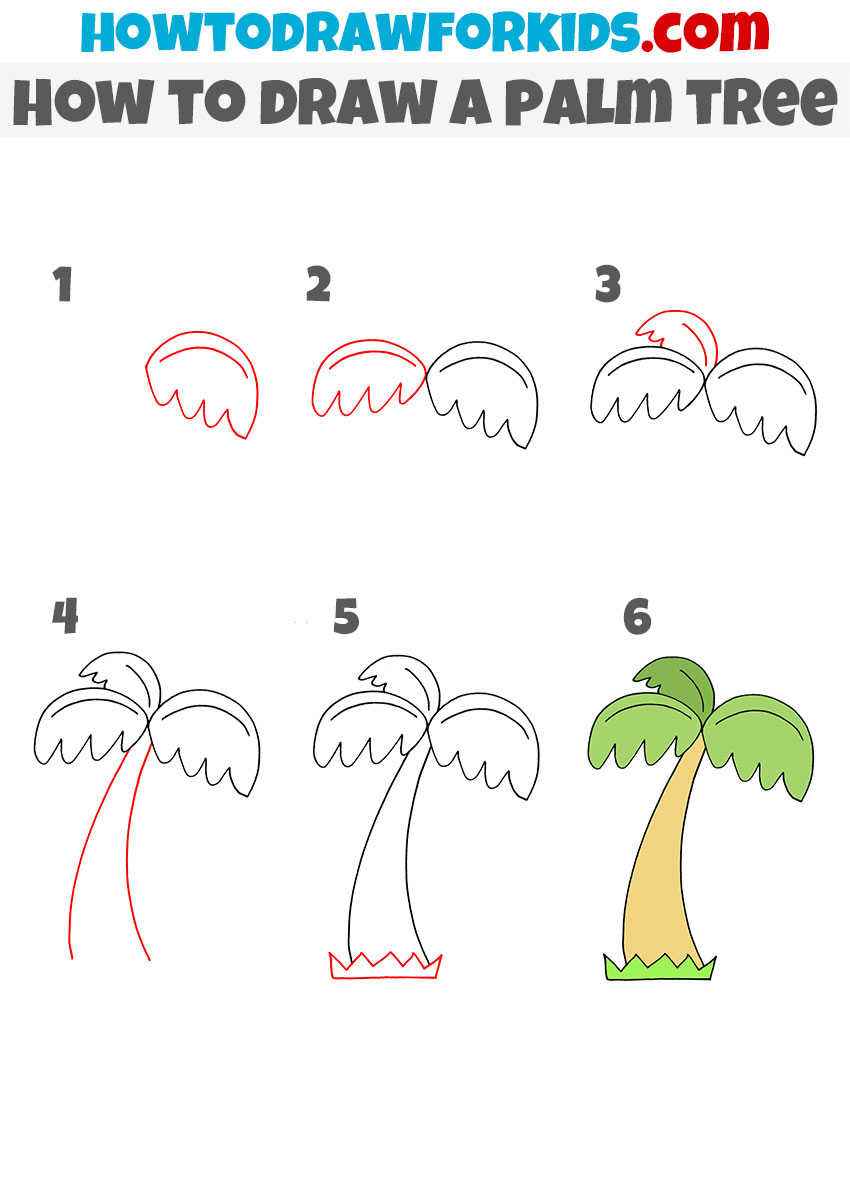
- Getting Started - The Basic Shapes for How to Draw a Palm Tree
- How to Draw a Palm Tree Trunk - Getting the Right Shape
- Adding the Bark - The Little Details for How to Draw a Palm Tree
- How Do You Sketch the Leaves of a Palm Tree?
- Refining Your Palm Tree Sketch - Making It Look Good
- Where Do the Coconuts Go on Your Palm Tree Art?
- What Colors Make Your Palm Tree Pop?
What Do You Need to Start Your Palm Tree Drawing?
So, before we even put pencil to paper, it's a good idea to gather up your drawing stuff. You don't need anything too fancy, just the basics. A pencil, maybe a few different kinds if you have them, like one for light lines and one for darker ones, could be really helpful. A good eraser is also, you know, something you'll definitely want to have close by, because we all make little adjustments as we go.
You’ll also want some paper, of course. Any kind of paper will do, really, but something a little thicker might feel nicer to draw on. And, you know, if you plan to add color later, perhaps paper that can handle markers or watercolors would be a good choice. Just make sure you have a comfortable spot to work, too.
Having all your things ready to go, it makes the whole process smoother. It’s like getting your ingredients out before you start cooking; everything is just there, waiting. This way, you can just focus on the drawing itself and not worry about searching for a tool in the middle of your creative flow, which is pretty much the best way to do things.
Getting Started - The Basic Shapes for How to Draw a Palm Tree
When you first start to draw a palm tree, the very first thing to think about is the main body of the tree, which is the trunk. You might think it's just a straight line, but that's not quite right. It usually has a bit of a curve to it, which gives it a more natural look. So, you know, begin by drawing a line that curves a little.
This curved line, as a matter of fact, will be the central support for your whole tree. It’s the spine, if you will. You want it to be a bit wider at the very bottom, where it meets the ground, and then get a little bit skinnier as it goes up towards the top. This shape, you know, helps it look more like a real tree standing tall.
For the leaves, or fronds, as they're often called, you can start with a simple single line for each one. This line, you know, is where the main vein of the leaf would be. It gives you a good starting point to build the rest of the leaf around. Think of it as a guide, helping you to get the overall shape just right.
These starting lines for the leaves, they tend to spread out from the top of the trunk, kind of like a burst of fireworks. Some might go up a bit, some might droop down, and some might go out to the sides. This variety, you see, will make your palm tree look more alive and interesting. It's almost like giving each leaf its own little personality.
How to Draw a Palm Tree Trunk - Getting the Right Shape
Now, let’s get into the trunk itself, for how to draw a palm tree. As we talked about, it’s not just a straight pole. You will want to make it a bit narrower as it reaches up towards the sky and, you know, wider where it touches the earth. This slight change in width gives it a feeling of strength at the bottom and a bit of grace as it rises.
The gentle curve, too, it's really important. It’s what makes the tree feel like it belongs in a breezy, warm place. A perfectly straight trunk can look a little stiff, but a little bend, you know, makes it seem like it's swaying in the wind. You could even draw a very elongated triangle shape, just to get the basic outline down, then round out the edges.
Once you have that basic curved shape, you can add a second line to create the other side of the trunk. Make sure these two lines follow each other, keeping that gradual change in width. This creates the full body of the trunk, giving it a real presence on your paper. It’s pretty much the backbone of your palm tree drawing.
Adding the Bark - The Little Details for How to Draw a Palm Tree
The bark on a palm tree trunk, you know, is where you can really show some individual style. It's not like the bark on a typical oak tree; it has its own special look. You'll often see rings or little bumpy marks that go around the trunk, almost like segments. This is where, you know, a lot of the visual interest comes in.
To make these marks, you can draw a series of curved lines that go across the trunk. They don't have to be perfect, because, you know, nature isn't always perfectly neat. Some might be closer together, some further apart, and some might be a little more pronounced than others. This variation, you see, helps make your tree look more real.
You might also see little diamond or criss-cross patterns on some palm tree trunks, depending on the type. Adding these small details, you know, really brings the trunk to life. It’s these tiny touches that make your drawing feel finished and give it a feeling of texture. It’s pretty much like adding the final touches to a good story.
How Do You Sketch the Leaves of a Palm Tree?
When you're working on how to draw a palm tree, the leaves are, you know, a very important part of what makes it recognizable. Each leaf, or frond, typically starts with that single line we talked about earlier. This line acts as the central rib of the leaf, and everything else grows from there. It's a bit like the spine of a fish, in a way.
From that central line, you will want to draw smaller lines or shapes coming off to either side. These represent the individual leaflets that make up the whole frond. They tend to be long and thin, and they might droop down a little or stick out. The key, you know, is to make them look like they're fanning out from the middle.
Some palm leaves, you know, might look more like a feather, with many small, separate pieces coming off the main stem. Others might be more fan-shaped, with the leaflets joined closer together at the base. You can try out different ways to draw these, just to see what kind of palm tree you want to create. It’s pretty much about experimenting a little.
As you draw these leaf shapes, remember that they shouldn't all be exactly the same. Some might be a bit longer, some a little shorter, and some might have a bit more of a bend to them. This natural variation, you know, is what makes a drawing look truly organic and less stiff. It's like giving each leaf its own little character.
Refining Your Palm Tree Sketch - Making It Look Good
Once you have the basic outlines of your palm tree, for how to draw a palm tree, it's time to make it look even better. This means going back over your lines and making them cleaner and more definite. If you have any extra lines or lines that overlap where they shouldn't, you know, now is the time to gently erase them.
You can also refine the edges of each frond. Make them look a little more jagged or textured, like real palm leaves. They aren't perfectly smooth, so adding a few little bumps or breaks along the edges can really help. It’s pretty much about adding those small details that make a big difference.
Look at the trunk lines, too. Make sure they flow nicely and that the width changes smoothly from bottom to top. You can add a little bit of shading to the trunk to give it a feeling of roundness, making it look like it has some depth. This step, you know, is all about polishing your work and making it shine.
This is also a good moment to look at the overall shape of your tree. Does it look balanced? Are the leaves spread out in a way that feels natural? You can make small adjustments here and there, just to get everything looking just right. It's like giving your artwork a final once-over before you call it done.
Where Do the Coconuts Go on Your Palm Tree Art?
If you're looking to add a little something extra to your palm tree drawing, you know, coconuts are a pretty good choice. They usually hang in clusters right near the top of the trunk, tucked in among the bases of the leaves. They're typically round or slightly oval shapes, and they add a nice touch of realism.
You can draw a few coconuts, perhaps two or three, grouped together. To make them look more natural, you can draw one so it looks like it's a little bit in front of another. This gives them a feeling of depth and makes them seem like they're really hanging there. They should be placed, you know, at about half the height of the first tree, if you are drawing more than one.
These circular shapes, you know, can just fill in the spaces between the leaves near the center of the top part of the trunk. They don't need a lot of detail at first, just the basic shape. Later, you can add some texture to them, maybe some little dots or lines, to make them look like real coconuts. It’s pretty much the cherry on top for your tropical scene.
What Colors Make Your Palm Tree Pop?
Once you have your palm tree drawn, you know, it's time to bring it to life with some color. Palm tree trunks are usually a tan or a brownish color, something like a light brown or a sandy yellow. You can use different shades of these colors to add some depth and make the trunk look more real.
For the leaves, a nice green is the typical choice. But, you know, not all greens are the same. You could use a brighter green for the leaves that are catching more light and a darker, deeper green for the ones that are in shadow. This variation in color, you see, makes the leaves look more lively and less flat.
If you added coconuts, they are usually a brownish-green when they're still on the tree, or a darker brown if they've dried out. You can pick the color that makes the most sense for the scene you're creating. Adding color, you know, is where your palm tree really starts to feel finished and ready to be shown off. It’s pretty much the fun part.