Knowing how to use a tape measure well is, in a way, a truly helpful ability, particularly when you are busy with things around the house. It helps change your living area from a place of guessing wrong to somewhere that feels just right. This little tool, you know, is pretty much the most common measuring device used all over the globe. Millions of skilled workers and folks doing their own projects use it every single day.
While, too it's almost, figuring out how to read a tape measure might seem a bit simple, there are actually some neat little ideas and clever moves that can make your measuring faster and even more spot-on. You might even discover some parts of your tape measure you didn't realize were there, making your work smoother. This guide is here to help you get a good handle on things.
Whether you are fixing things up at home, doing a bit of woodworking, or just trying to measure something for a craft, getting good at reading this tool is a big help. We will, in some respects, go through the basics, showing you how to read the different lines and numbers so you can feel more sure about your projects, every single time.
Table of Contents
- Understanding Your Tape Measure's Pieces
- Getting to Know the Parts of how to read a tape measure
- How Do You Read Imperial Measurements?
- Figuring Out the Small Marks on how to read a tape measure
- How Do You Read Metric Measurements?
- Are There Any Hidden Tricks to Reading a Tape Measure?
- Making Your Measurements More Precise with how to read a tape measure
- How Can You Check Your Tool's Accuracy?
Understanding Your Tape Measure's Pieces
Before we start looking at how to figure out the lengths on the tape, it's a good idea, you know, to talk about some of the main bits and pieces. Tape measures might look a little different from one another, especially with how some of their features appear, but most of them have similar fundamental parts. Getting familiar with these will make everything else much clearer, which is pretty helpful.
Getting to Know the Parts of how to read a tape measure
A tape measure, which people also call a measuring tape, is, basically, a flexible strip marked with lengths, used for measuring distances. The main parts include the hook, the long, thin metal strip called the blade, and the protective casing that holds it all. Learning how to use the hook, the blade, and the case of your tape measure correctly and safely is, in fact, quite important for getting good results.
The hook is the small metal piece at the very beginning of the tape. It usually has a little bit of play in it, meaning it can slide back and forth a tiny bit. This movement is, actually, on purpose. When you hook it onto the edge of something, it pushes in, and when you push the tape against a surface, it pulls out. This small adjustment helps you get a correct length, whether you are measuring from an outside edge or an inside corner, so it's quite clever.
The blade is the long, bendy part with all the numbers and lines. This is where you will see all the different markings that tell you the length. The case is the outer shell that keeps the blade safe when it is not being used. It also has a locking mechanism, usually a button or a switch, that lets you hold the blade steady at a certain length. This is, you know, super handy when you need to mark a spot or keep a measurement without the tape slipping back inside.
Some tape measures might also have other markings or features on the case itself, like, for instance, a small diagram showing how to figure out the inside measurement of a window frame by adding the case's length. Knowing about these parts really helps you use your tool to its fullest. It's not just about the lines, but also about how you handle the whole thing, which, arguably, makes a big difference in your work.
How Do You Read Imperial Measurements?
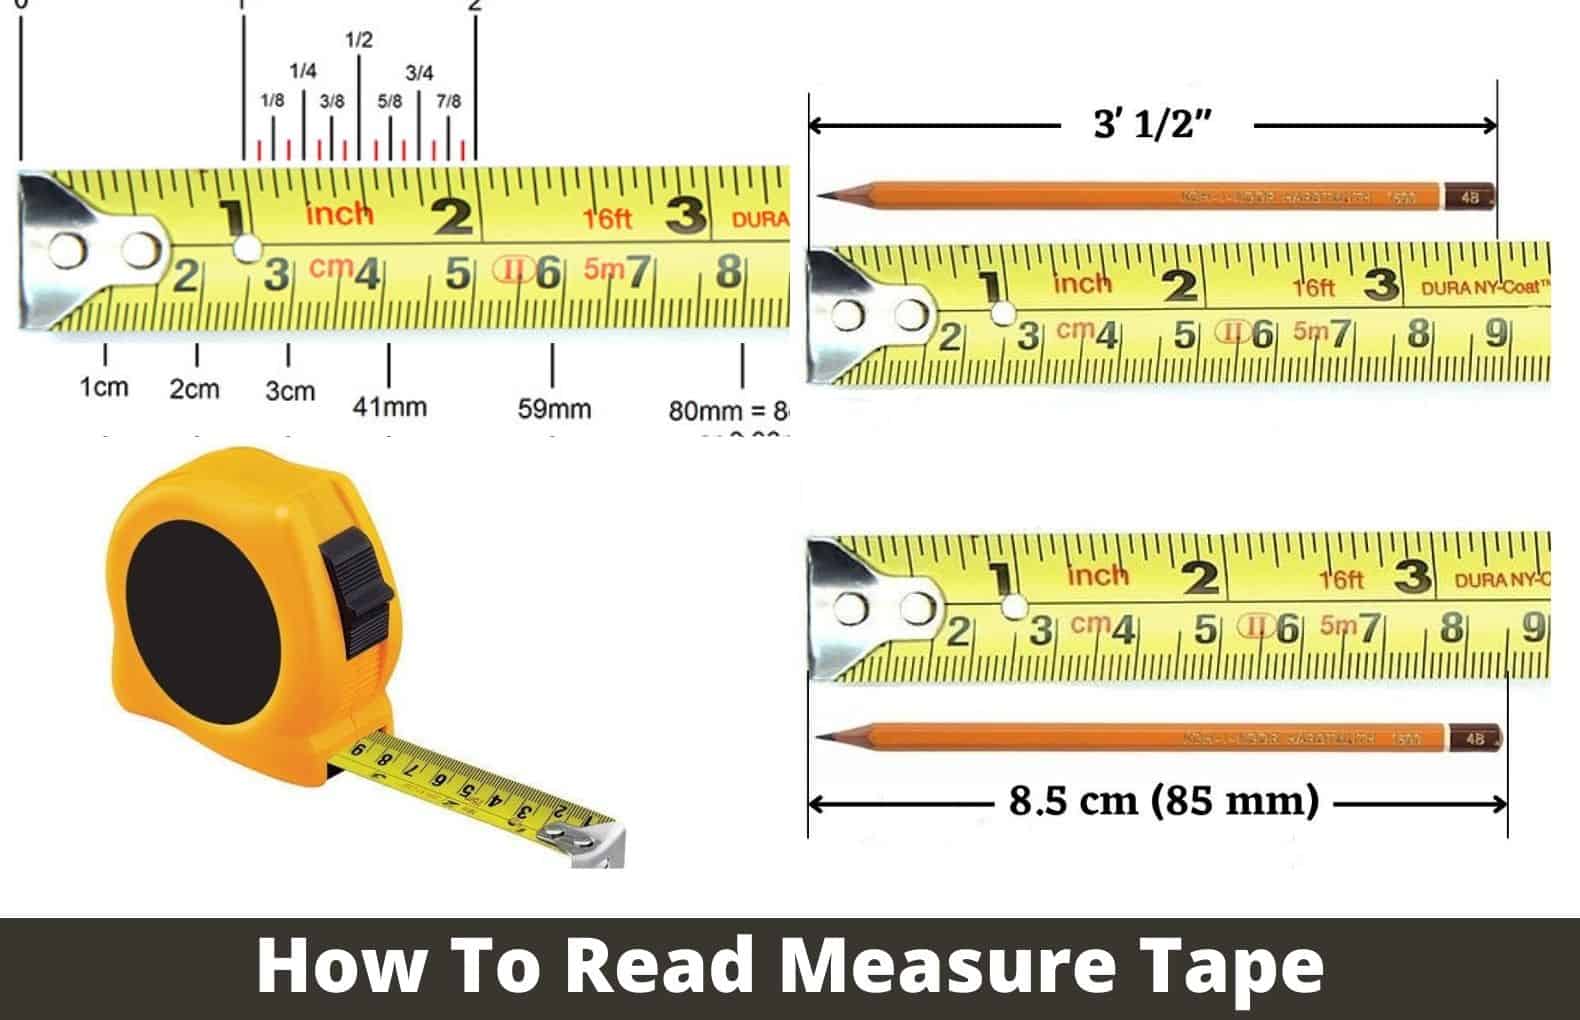
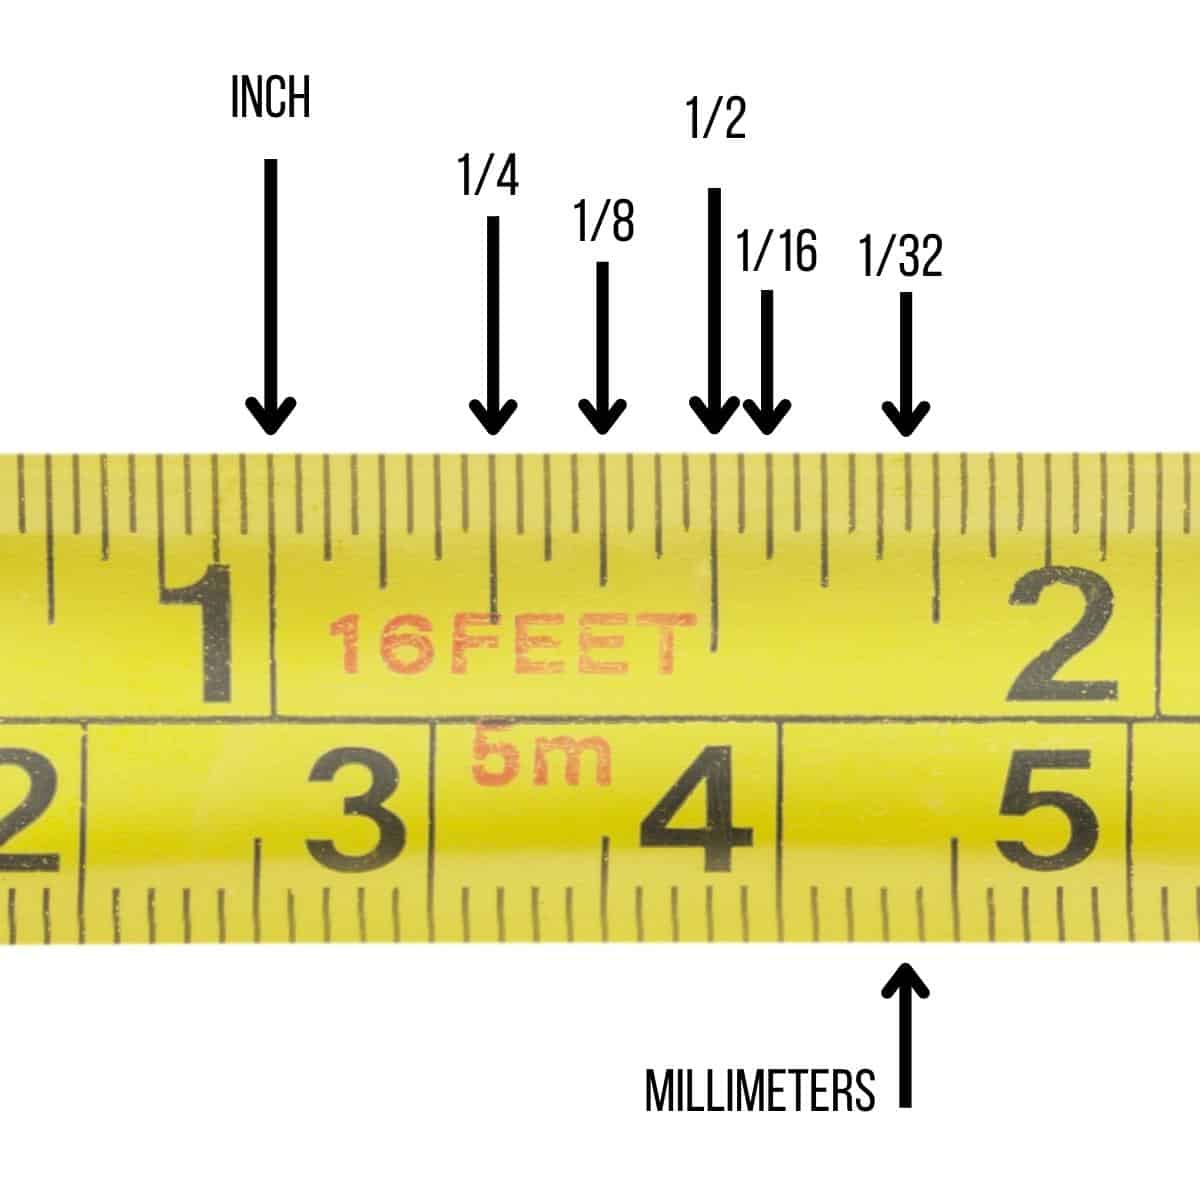
When you pull out the tape, you will, of course, spot bigger marks that show whole inches, with smaller marks placed between them. This is, in a way, just like a basic ruler you might have used in school. The longest marks are the ones that point to the full inches. These often have the biggest numbers next to them, or sometimes they are shown with a different color, like a red line, or a bold arrow, making them easy to pick out.
Foot marks, which are, you know, every twelve inches, are also usually quite noticeable on the tape. They might be marked with a special symbol or a bigger, different colored number. So, for example, if you see a "1F" or a "2F" on the tape, that means you have reached one foot or two feet. This helps when you are measuring longer distances, as you don't have to count all the inches, which is pretty convenient.
Figuring Out the Small Marks on how to read a tape measure
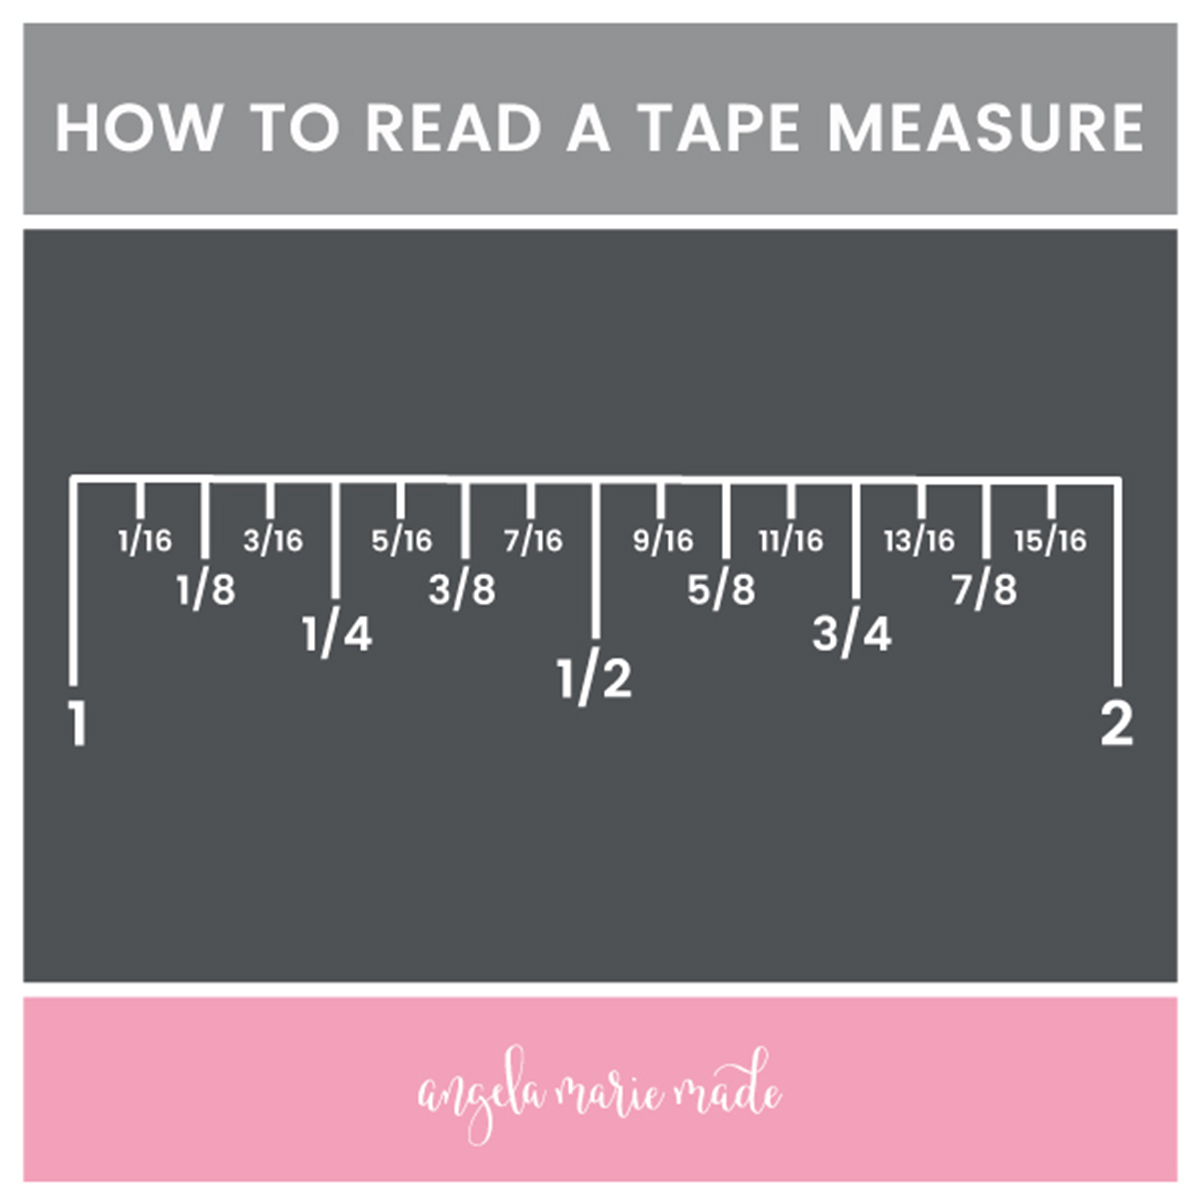
The smaller lines between the inch marks are where people sometimes get a little confused. These lines show parts of an inch, usually in fractions like halves, quarters, eighths, and sixteenths. To read a tape measure, you first find the number next to the large mark for the whole inch. Then, you figure out how many small marks past that inch the measurement reaches, which is, essentially, the fractional part.
Imagine, for instance, an inch divided into sixteen tiny parts. The longest line between two inch marks is the half-inch mark. It's usually a bit shorter than the full inch marks but longer than the other fractional lines. Then, you have the quarter-inch marks, which are shorter than the half-inch but longer than the eighths, and so on. The smallest lines are, typically, the sixteenths of an inch, and these are, more or less, the most common divisions you will see on an imperial tape measure.
To get your full measurement, you add the number next to the whole inch mark with the fractional part. So, if your measurement goes past the 5-inch mark and lands on the third small line after the half-inch mark, you would count it out. That would be 5 inches, plus a half-inch, plus another sixteenth. This makes it 5 and nine-sixteenths of an inch, or 5 9/16 inches, which is, you know, a common way to say it.
Some folks find it easier to think of it like this: every inch has 16 little lines if you count all the smallest ones. So, if your measurement lands on the fifth small line after the 7-inch mark, that would be 7 and five-sixteenths of an inch. Understanding what each of these 16 marks means is, in fact, the easiest way to read a tape measure with all those lines. A visual guide, like an image showing each mark, can really help you grasp this, too it's almost, instantly.
How Do You Read Metric Measurements?
Metric system tape measures use centimeters and millimeters. These tape measures are, basically, split into ten millimeters for each centimeter mark. This makes them, in a way, a bit simpler to read for some people because everything is based on tens, which is what we use for counting every day. There are no fractions like in the imperial system, just whole numbers and decimals.
On a metric tape measure, you will see larger numbers for centimeters, often marked with "cm." Between each centimeter mark, there are ten smaller lines. Each of these smaller lines stands for one millimeter. So, if your measurement goes past the 25-centimeter mark and lands on the seventh small line after it, that would be 25 centimeters and 7 millimeters, or 25.7 centimeters, which is, obviously, very straightforward.
This guide covers everything from figuring out lengths in inches to metric systems like centimeters and millimeters. We will, as a matter of fact, also show you how to read measurements that might not be perfectly even numbers, like those that fall between the larger marks. Knowing the difference between metric and imperial measurements is, naturally, very useful, especially if you work with plans from different places around the globe.
Are There Any Hidden Tricks to Reading a Tape Measure?
While it's fairly simple to read a tape measure, some clever ideas and techniques can make your measuring quicker and even more precise. Plus, we will, you know, help you discover tape measure features you didn't even know were there, which can make your projects go much smoother. These aren't really "hidden secrets" but more like smart ways to use your tool to its fullest potential.
Making Your Measurements More Precise with how to read a tape measure
One very helpful trick is to apply firm but gentle pressure when you are pulling the tape measure tight. You should also, you know, hold the tape measure close to the surface you are measuring. This helps prevent the tape from bending or sagging, which could throw off your length. For instance, when measuring from a wall, ceiling, or other surface, holding the tape flat against it is, basically, key for getting a correct number.
Another smart move is to use the little slot or hole in the hook at the end of your tape measure. This tiny opening is, actually, there so you can hook the tape onto a nail or a screw, letting you measure long distances by yourself without needing someone to hold the other end. This is, in fact, incredibly useful for bigger projects where you might be working alone, giving you a steady starting point.
Some tape measures highlight important markings, too. You might notice, for example, certain numbers or lines that are colored differently or have a small diamond shape next to them. These often mark common spacing for studs in wall framing, like every 16 inches or 24 inches. Knowing what these special marks mean can, you know, save you time when building things, as you don't have to measure out those common distances each time.
How Can You Check Your Tool's Accuracy?
It is, naturally, a good idea to check how accurate your tape measure is from time to time. You can do this by measuring something you know the length of already, like a piece of wood that is exactly 12 inches long, or a standard-sized book. If your tape measure shows a slightly different length for that known item, then you know it might not be giving you the most correct numbers, which is, you know, important to realize.
To do this check, pick something with a clear, known length. Lay your tape measure next to it and see if the numbers line up exactly. If they do, great! Your tape is, more or less, giving you good information. If not, you might want to try another tape measure, or just be aware that your current one might be a little off, and adjust your work accordingly. This small step can, in fact, help you avoid common mistakes and make sure your projects turn out just right.
Sometimes, the hook at the very beginning of the tape can get bent or damaged, which can throw off your measurements. If you suspect this, you can check it by measuring a piece of scrap material, then flipping the tape measure over and measuring it again from the other side. If the two measurements are different, your hook might be bent. This is, you know, a simple way to figure out if your tool is giving you consistent results, which is pretty important for any kind of building or fixing.