SSH login for IoT devices on Mac is more than just a technical process; it’s your gateway to managing smart devices securely and efficiently. Whether you’re a hobbyist tinkering with your home automation setup or a professional handling enterprise-grade IoT networks, understanding SSH is critical. Picture this: you’ve got your IoT devices scattered across your home or office, and you need a reliable way to access them remotely without compromising security. SSH is the answer, my friend, and we’re about to dive deep into how you can master it on a Mac.
Let’s face it, the Internet of Things (IoT) has taken the world by storm. From smart thermostats to industrial sensors, IoT devices are everywhere. But managing these devices isn’t always a walk in the park. That’s where SSH comes in. It’s like the secret handshake that allows you to securely communicate with your devices over the internet. In this guide, we’ll break down everything you need to know about SSH login for IoT devices on Mac, so you can become the tech wizard you’ve always dreamed of being.
Now, I know what you’re thinking – “Isn’t SSH just for server nerds and IT pros?” Well, not anymore. With the rise of IoT, even casual users need to understand SSH to keep their devices safe and functional. So, whether you’re setting up a Raspberry Pi or managing a fleet of smart cameras, this guide will walk you through every step. Let’s get started, shall we?
Read also:Josh Gates Hospitalized 2024 The Inside Scoop You Need To Know
What is SSH and Why Should You Care About It?
SSH, or Secure Shell, is like the VIP pass to your IoT devices. It’s a protocol that lets you securely log in to remote devices and execute commands as if you were sitting right in front of them. But here’s the kicker: SSH encrypts all your communication, so no one can eavesdrop on your activities. Imagine having a private conversation with your smart fridge about what groceries to order – SSH makes sure that conversation stays between you and your fridge.
Now, why should you care? Well, the Internet of Things is all about connectivity, but with connectivity comes risks. Hackers love IoT devices because they’re often less secure than traditional computers. By using SSH, you’re adding an extra layer of protection that keeps the bad guys out. Plus, it’s super convenient. No more running around your house to physically access each device – SSH lets you manage everything from your cozy desk.
Setting Up SSH on Your Mac: The Basics
Before we jump into logging into IoT devices, let’s make sure your Mac is ready for the task. First things first, you’ll need to enable SSH on your Mac. Don’t worry, it’s not rocket science. Just head over to System Preferences, click on Sharing, and check the box next to Remote Login. Boom! You’ve just enabled SSH on your Mac. But wait, there’s more.
Once SSH is enabled, you’ll need to know your Mac’s IP address. This is like the street address for your computer on the network. You can find it in the Network section of System Preferences. Now, with SSH enabled and your IP address in hand, you’re ready to start connecting to your IoT devices. Easy peasy, right?
Tools You’ll Need for SSH Login
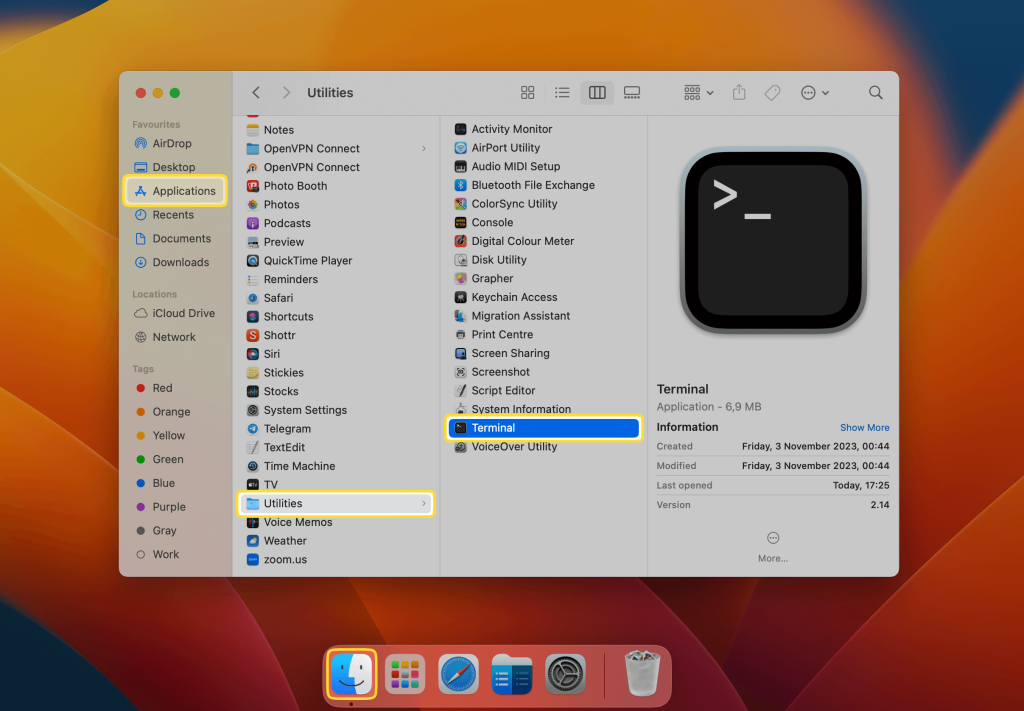
Alright, now that your Mac is set up, let’s talk about the tools you’ll need to connect to your IoT devices. First up, you’ll need an SSH client. Lucky for you, macOS comes with a built-in SSH client, so you don’t need to install anything extra. Just open up Terminal – you’ll find it in Applications > Utilities. Terminal is your gateway to the world of SSH.
But wait, what if you want something a little fancier? There are plenty of third-party SSH clients out there, like PuTTY or MobaXterm. These tools offer more features and a graphical interface, which might be helpful if you’re not a fan of command lines. However, for most users, the built-in Terminal app will do just fine. It’s like having a Swiss Army knife in your pocket – simple, yet powerful.
Read also:Brit Bag Reviews The Ultimate Guide To Finding The Perfect British Handbag
Understanding IoT Devices and Their SSH Capabilities
Not all IoT devices are created equal, and the same goes for their SSH capabilities. Some devices come with SSH pre-installed and ready to go, while others might require a bit of setup. For example, if you’re using a Raspberry Pi, SSH is usually enabled by default. But what about other devices, like smart cameras or environmental sensors? That’s where things can get a little tricky.
To check if your IoT device supports SSH, you’ll need to consult its documentation or do a quick Google search. Most modern IoT devices will have SSH support, but it’s always good to double-check. Once you’ve confirmed that SSH is supported, you’ll need to find out the device’s IP address. This is usually displayed in the device’s settings or management interface. With the IP address in hand, you’re ready to start the SSH login process.
Common IoT Devices and Their SSH Configurations
Let’s take a look at some common IoT devices and how you can configure SSH on them. First up, we’ve got the Raspberry Pi. As I mentioned earlier, SSH is usually enabled by default, but if it’s not, you can enable it through the Raspberry Pi Configuration tool. Just head over to Preferences > Raspberry Pi Configuration, and you’ll find the SSH option under the Interfaces tab.
Next, let’s talk about smart cameras. Many modern smart cameras come with SSH support, but you’ll need to enable it through the camera’s web interface. This usually involves logging into the camera’s management portal and navigating to the SSH settings. Once enabled, you can use SSH to access the camera’s file system and configure advanced settings.
The SSH Login Process: Step by Step
Now that you’ve got everything set up, it’s time to dive into the SSH login process. Don’t worry, it’s not as scary as it sounds. First, open up Terminal on your Mac and type in the following command: ssh username@device_ip_address. Replace "username" with the username for your IoT device and "device_ip_address" with the actual IP address of your device. Hit enter, and you’ll be prompted to enter the password for the device. Once you’ve entered the password, voila! You’re in.
But what if you want to make things a little easier? You can set up SSH keys, which allow you to log in without entering a password every time. To do this, you’ll need to generate an SSH key pair on your Mac and copy the public key to your IoT device. This might sound complicated, but it’s actually pretty straightforward. Just run the command ssh-keygen to generate the key pair, and then use ssh-copy-id to copy the public key to your device.
Troubleshooting Common SSH Issues
Let’s face it, things don’t always go as planned. If you’re having trouble logging into your IoT device via SSH, here are a few things to check. First, make sure that SSH is enabled on the device. Double-check the IP address and username to ensure they’re correct. If everything looks good, try restarting both your Mac and the IoT device. Sometimes, a simple reboot can fix connection issues.
Another common issue is firewall settings. If your IoT device is behind a firewall, you might need to configure the firewall to allow SSH traffic. This usually involves opening port 22, which is the default port for SSH. If you’re still having trouble, don’t hesitate to consult the device’s documentation or reach out to the manufacturer’s support team. They’re there to help, and trust me, you’re not the first person to run into SSH issues.
Securing Your SSH Connections
Now that you’ve got SSH up and running, it’s time to talk about security. SSH is secure by default, but there are a few things you can do to make it even more secure. First, consider disabling password authentication and using SSH keys instead. This eliminates the risk of someone guessing your password and gaining unauthorized access to your devices.
Another security tip is to change the default SSH port from 22 to something less common. This makes it harder for hackers to find your SSH service and attempt to brute-force their way in. You can also set up IP whitelisting, which only allows connections from specific IP addresses. This is especially useful if you only access your IoT devices from a few known locations.
Best Practices for SSH Security
Here’s a quick rundown of best practices for securing your SSH connections:
- Use SSH keys instead of passwords
- Change the default SSH port
- Enable IP whitelisting
- Regularly update your devices and SSH software
- Monitor SSH logs for suspicious activity
By following these best practices, you’ll significantly reduce the risk of unauthorized access to your IoT devices. Remember, security is a marathon, not a sprint. It’s all about staying vigilant and taking proactive steps to protect your devices.
Advanced SSH Techniques for IoT Devices
Once you’ve mastered the basics, it’s time to level up your SSH game. There are plenty of advanced techniques you can use to make your SSH experience even better. For example, you can set up SSH tunnels, which allow you to securely access services running on your IoT devices. This is especially useful if you want to access a web interface or database on the device without exposing it to the internet.
Another advanced technique is using SSH to automate tasks. You can write scripts that connect to your IoT devices via SSH and perform routine maintenance tasks, like updating software or backing up data. This not only saves you time but also ensures that your devices are always up to date and running smoothly.
SSH Automation with Scripts
Let’s take a closer look at SSH automation with scripts. You can use tools like Bash or Python to write scripts that automate repetitive tasks. For example, you could write a script that connects to your IoT devices, checks their status, and sends you an email if anything looks suspicious. This is a great way to keep an eye on your devices without having to manually check them every day.
Another cool thing you can do with SSH scripts is perform bulk operations on multiple devices. Imagine you’ve got a fleet of IoT devices scattered across your home or office. With a single script, you can connect to all of them, run commands, and collect data. It’s like having a personal assistant for your IoT network.
SSH Login for IoT Devices on Mac: The Future
As the Internet of Things continues to grow, the importance of SSH login for IoT devices on Mac will only increase. More and more devices will be connected to the internet, and managing them securely will become a top priority. By mastering SSH, you’ll be ahead of the curve and ready to tackle whatever challenges come your way.
But it’s not just about managing devices – it’s about building a smarter, more connected world. With SSH, you can unlock the full potential of your IoT devices and create a network that works seamlessly together. Whether you’re automating your home or monitoring industrial processes, SSH is the key to making it all happen.
Tips for Staying Ahead in the IoT World
Here are a few tips to help you stay ahead in the rapidly evolving world of IoT:
- Keep learning about new technologies and tools
- Stay up to date with security best practices
- Experiment with different IoT devices and setups
- Join online communities to share knowledge and ideas
By staying informed and engaged, you’ll be able to adapt to changes and continue growing your skills. Remember, the IoT world is full of opportunities, and SSH is your ticket to exploring them all.
Conclusion: Take Action and Secure Your IoT Network
There you have it – everything you need to know about SSH login for IoT devices on Mac. From setting up SSH to securing your connections and exploring advanced techniques, this guide has covered it all. Now it’s your turn to take action. Start practicing SSH on your devices, experiment with different configurations, and don’t be afraid to ask for help if you need it.
And remember, the world of IoT is only going to get more exciting. By mastering SSH, you’re not just learning a skill – you’re opening the door to a world of possibilities. So, what are you waiting for? Get out there and start connecting, configuring, and controlling your IoT devices like a pro. And don’t forget to share your experiences and discoveries with the rest of us – we’d love to hear from you!
Table of Contents