Imagine this: you're chilling at a café miles away from your desk, sipping coffee, and suddenly you need to access your Mac remotely. No problem, right? Wrong! Unless you know how to use SSH IoT from anywhere to log into your Mac, you're in for a wild ride. But don’t freak out—this article is here to save the day. We’ll break it down step by step so you can SSH into your Mac like a pro, no matter where you are. Let’s get started!
SSH, or Secure Shell, is like a secret tunnel that lets you securely connect to your Mac from anywhere in the world. It’s not just for tech wizards anymore; anyone can use it with a little guidance. Whether you're managing IoT devices or just trying to access files on your Mac remotely, SSH is your new best friend. And guess what? You don’t even need to be a coding guru to pull it off.
In this guide, we’ll walk you through everything you need to know about using SSH for IoT from anywhere and logging into your Mac without any hassle. By the end of this article, you’ll feel like a certified SSH ninja. So buckle up and let’s dive into the world of remote access!
Read also:Richard Leete Robbins The Man Who Revolutionized Modern Business Practices
Table of Contents
- What is SSH and Why Should You Care?
- SSH IoT Overview: The Basics You Need to Know
- How to Set Up SSH on Your Mac
- Accessing Your Mac Remotely via SSH
- Configuring Your Firewall for SSH Access
- Using Dynamic DNS for Easy SSH Connections
- Top Security Tips for SSH IoT Connections
- Troubleshooting Common SSH Issues
- Alternatives to SSH for Remote Access
- Wrapping It Up: Your SSH Journey Awaits
What is SSH and Why Should You Care?
SSH, or Secure Shell, is like a superhero for remote connections. It allows you to securely access and manage devices over the internet, even if they’re miles apart. Think of it as a secure, encrypted tunnel that keeps your data safe while you work remotely. Whether you're dealing with IoT devices or just trying to access your Mac from another location, SSH is the tool you need.
But why should you care? Well, in today’s fast-paced world, being able to access your devices from anywhere is a game-changer. Whether you're troubleshooting a server, managing IoT devices, or simply grabbing a file from your Mac, SSH makes it all possible. Plus, it’s free, easy to set up, and super secure if you follow the right steps.
SSH IoT Overview: The Basics You Need to Know
When it comes to IoT (Internet of Things), SSH is a lifesaver. IoT devices are everywhere these days—smart homes, wearables, industrial sensors, you name it. But managing these devices remotely can be a challenge. That’s where SSH comes in. It lets you securely connect to and manage your IoT devices from anywhere in the world.
Here’s the deal: IoT devices often run on lightweight operating systems, making them perfect candidates for SSH. You can use SSH to update firmware, check logs, or even reboot devices—all without being physically present. This level of control is invaluable for anyone working with IoT technology.
Why Use SSH for IoT?
Let’s break it down:
- Security: SSH encrypts all your data, keeping it safe from prying eyes.
- Reliability: Once set up, SSH connections are rock-solid and rarely fail.
- Flexibility: You can manage multiple devices from a single location.
- Cost-Effective: SSH is free and doesn’t require expensive software or hardware.
How to Set Up SSH on Your Mac
Setting up SSH on your Mac is easier than you think. Follow these simple steps, and you’ll be ready to roll in no time:
Read also:Is There Really A Salt Trick For Men The Truth Unveiled
Step 1: Enable SSH on Your Mac
First things first, you need to enable SSH on your Mac. Here’s how:
- Go to System Preferences.
- Click on Sharing.
- In the left-hand menu, check the box for Remote Login.
- You’ll see a message saying, "Remote login is on." Boom! You’re done.
Step 2: Find Your Mac’s IP Address
To connect to your Mac via SSH, you’ll need its IP address. Here’s how to find it:
- Open System Preferences.
- Click on Network.
- Select your active network connection (Wi-Fi or Ethernet).
- Your IP address will be listed under Status.
Accessing Your Mac Remotely via SSH
Now that SSH is enabled on your Mac, it’s time to connect from another device. Here’s how:
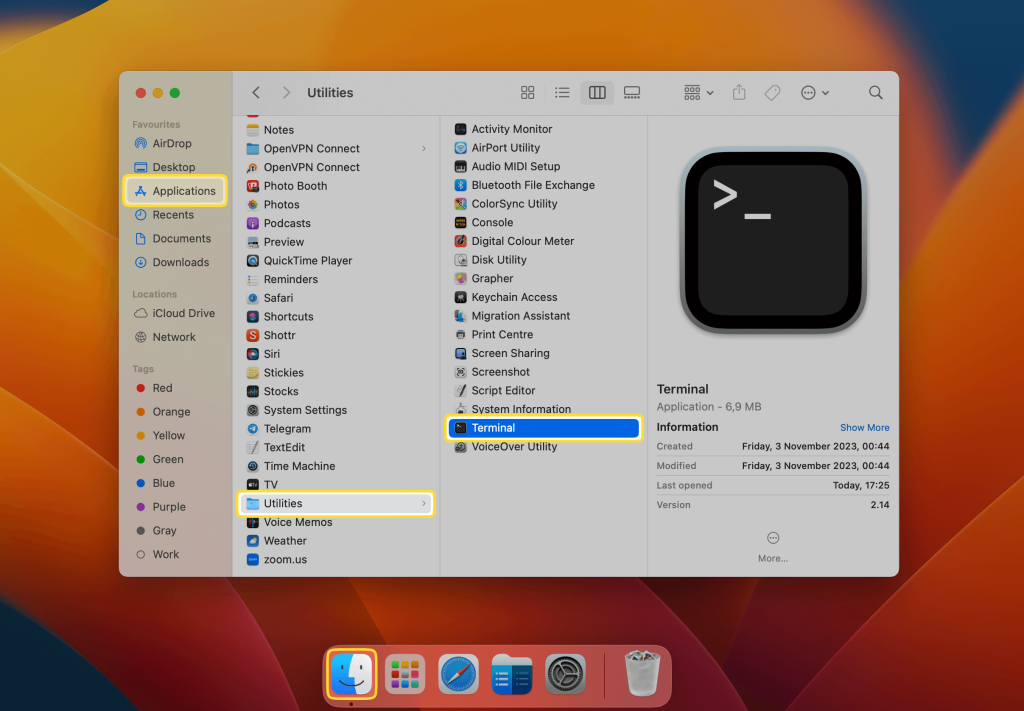
Step 1: Open Terminal
If you’re using a Mac or Linux device, open the Terminal app. For Windows users, you can use PuTTY or the built-in SSH client in PowerShell.
Step 2: Enter the SSH Command
Type the following command into the Terminal:
ssh username@ip_address
Replace username with your Mac’s username (you can find this in System Preferences > Users & Groups) and ip_address with your Mac’s IP address.
Step 3: Enter Your Password
When prompted, enter your Mac’s password. Voilà! You’re now connected to your Mac via SSH.
Configuring Your Firewall for SSH Access
If you’re trying to access your Mac from outside your local network, you’ll need to configure your firewall. Here’s how:
Step 1: Log in to Your Router
Open a web browser and enter your router’s IP address (usually something like 192.168.0.1). Log in with your router’s credentials.
Step 2: Set Up Port Forwarding
Find the port forwarding section in your router’s settings. Add a new rule to forward port 22 (the default SSH port) to your Mac’s IP address.
Step 3: Test Your Connection
Try connecting to your Mac using its public IP address instead of the local one. If everything’s set up correctly, you should be good to go.
Using Dynamic DNS for Easy SSH Connections
Your public IP address can change from time to time, which can make SSH connections a pain. That’s where Dynamic DNS (DDNS) comes in. DDNS assigns a permanent domain name to your IP address, so you don’t have to worry about it changing.
How to Set Up DDNS
Most routers support DDNS out of the box. Here’s how to set it up:
- Log in to your router’s settings.
- Find the DDNS section and enable it.
- Choose a DDNS provider (like No-IP or DynDNS) and create an account.
- Enter your DDNS credentials into the router.
Now you can connect to your Mac using a domain name instead of an IP address. Easy peasy!
Top Security Tips for SSH IoT Connections
While SSH is secure by default, there are a few extra steps you can take to beef up your security:
- Change the Default Port: Instead of using port 22, change it to something less common to avoid automated attacks.
- Use Key-Based Authentication: Disable password-based login and use SSH keys instead. It’s way more secure.
- Limit Access: Restrict SSH access to specific IP addresses or networks to reduce the risk of unauthorized access.
- Keep Software Updated: Always update your operating system and SSH client to patch any security vulnerabilities.
Troubleshooting Common SSH Issues
Even the best-laid plans can go awry. Here are some common SSH issues and how to fix them:
Problem: Connection Refused
Solution: Make sure SSH is enabled on your Mac and that your firewall is configured correctly. Double-check your IP address and port number.
Problem: Permission Denied
Solution: Check your username and password. If you’re using key-based authentication, make sure your SSH keys are properly set up.
Problem: Connection Timeout
Solution: Ensure your router is forwarding the correct port and that your internet connection is stable. Try restarting your router if necessary.
Alternatives to SSH for Remote Access
While SSH is awesome, it’s not the only game in town. Here are a few alternatives for remote access:
- TeamViewer: A popular choice for cross-platform remote access.
- VNC: Allows you to remotely control your Mac’s graphical interface.
- AnyDesk: Another great option for remote desktop connections.
However, if security and simplicity are your top priorities, SSH is still the best choice for most users.
Wrapping It Up: Your SSH Journey Awaits
And there you have it—a comprehensive guide to using SSH IoT from anywhere to log into your Mac. Whether you’re managing IoT devices or just trying to access files remotely, SSH is a powerful tool that can make your life easier. By following the steps outlined in this article, you’ll be able to securely connect to your Mac from anywhere in the world.
So what are you waiting for? Grab your coffee, fire up your Terminal, and start exploring the world of SSH. And don’t forget to share this article with your friends and leave a comment below if you have any questions or tips of your own. Happy SSH-ing! ,