So, you’ve got this shiny new IoT device and you’re ready to dive in, but wait—how do you actually connect to it securely? Well, my friend, SSH login for IoT devices on a Mac is the way to go. Let’s break it down step by step, because trust me, once you master this, you’ll feel like a tech wizard. Whether you’re a seasoned pro or just starting out, SSH (Secure Shell) is your golden ticket to managing and configuring your IoT devices from your Mac.
SSH login is not just some random tech jargon—it’s a powerful tool that allows you to remotely access and control your IoT devices over a network. And guess what? Your Mac makes it super easy to set up. In this guide, we’ll walk you through everything you need to know, from the basics of SSH to troubleshooting common issues. So grab a cup of coffee, sit back, and let’s get started!
Now, before we dive into the nitty-gritty, let’s talk about why SSH is so important. Imagine your IoT device as a fortress, and SSH is the key that lets you in without compromising its security. With SSH, you can manage your device remotely, update its software, and even troubleshoot problems—all from the comfort of your Mac. Sounds pretty cool, right?
Read also:Is Emma Miskew Divorced Unveiling The Truth Behind Her Relationship Status
What Is SSH and Why Should You Care?
Alright, let’s start with the basics. SSH, or Secure Shell, is a protocol that provides a secure way to access remote computers and devices. It’s like a secret handshake that ensures only authorized users can access your IoT device. Unlike other methods, SSH encrypts your data, making it nearly impossible for hackers to intercept your communication.
Here’s why SSH matters for your IoT device:
- Security: SSH encrypts all data exchanged between your Mac and the IoT device, keeping prying eyes away.
- Reliability: SSH is widely used and trusted by professionals, meaning it’s battle-tested and reliable.
- Flexibility: You can perform a wide range of tasks using SSH, from file transfers to command execution.
Think of SSH as the Swiss Army knife of remote access tools. Whether you’re setting up a smart home system or managing a fleet of IoT devices, SSH has got your back.
How to Set Up SSH on Your Mac
Setting up SSH on your Mac is easier than you think. Here’s how you can do it:
Step 1: Enable SSH on Your Mac
First things first, you need to make sure SSH is enabled on your Mac. Follow these steps:
- Open System Preferences on your Mac.
- Click on Sharing.
- Check the box next to Remote Login.
- Make sure the checkbox for “Allow access for: All users” is selected.
And just like that, your Mac is ready to handle SSH connections. Pretty straightforward, huh?
Read also:Expedition Unknown Josh Gates Hospitalized Ndash What Really Happened
Step 2: Verify Your SSH Configuration
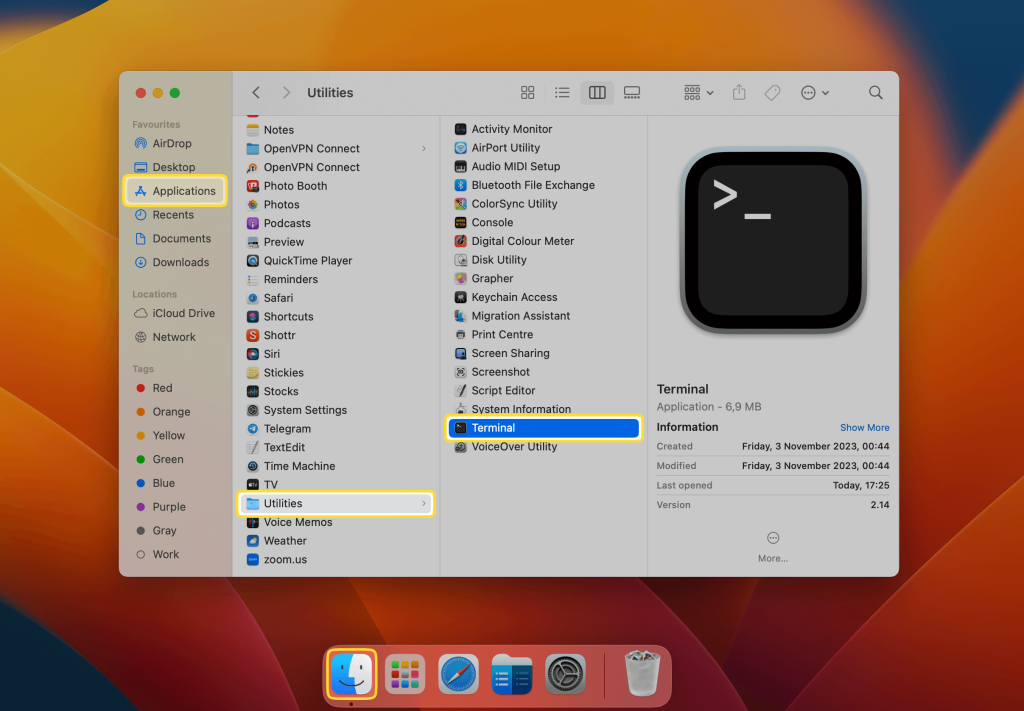
Once SSH is enabled, it’s a good idea to verify that everything is working as expected. Open your Terminal app (you can find it in Applications > Utilities) and type the following command:
ssh localhost
If everything is set up correctly, you should see a prompt asking for your password. Enter your Mac’s password, and voilà—you’re connected!
Connecting to an IoT Device via SSH
Now that your Mac is ready, let’s talk about connecting to your IoT device. Here’s what you need to do:
Step 1: Gather Your Device’s IP Address
Before you can connect to your IoT device, you’ll need its IP address. This can usually be found in the device’s settings or through your router’s admin interface. Write it down—you’ll need it in a moment.
Step 2: Open Terminal and Enter the SSH Command
With your device’s IP address in hand, open Terminal and type the following command:
ssh username@device_ip_address
Replace username with the actual username for your IoT device and device_ip_address with its IP address. Hit Enter, and you’ll be prompted to enter the password for the device.
Step 3: Verify the Connection
If everything goes smoothly, you should now be connected to your IoT device. You can test the connection by running a simple command, like:
ls
This will list the files and directories on your device, confirming that you’re good to go.
Common Issues and How to Fix Them
Even the best-laid plans can hit a snag. Here are some common issues you might encounter when trying to SSH into your IoT device, along with solutions:
Issue 1: Connection Refused
Symptoms: You get an error message saying “Connection refused.”
Solution: Double-check that SSH is enabled on both your Mac and the IoT device. Also, ensure that the IP address and username are correct.
Issue 2: Permission Denied
Symptoms: You’re unable to log in because of a “Permission denied” error.
Solution: Make sure you’re using the correct username and password. If the issue persists, check the device’s SSH configuration to ensure that password authentication is enabled.
Issue 3: Network Problems
Symptoms: You can’t reach the device at all.
Solution: Verify that both your Mac and the IoT device are connected to the same network. Restart your router if necessary.
Tips for Securing Your SSH Connection
While SSH is inherently secure, there are a few extra steps you can take to make your connection even more robust:
- Use Strong Passwords: Avoid using weak or easily guessable passwords for your IoT devices.
- Enable Key-Based Authentication: This eliminates the need for passwords altogether, making your connection more secure.
- Limit Access: Restrict SSH access to specific IP addresses or networks to reduce the risk of unauthorized access.
These tips might seem like overkill, but trust me, they’re worth it. Security is always a top priority, especially when dealing with IoT devices that can be vulnerable to attacks.
Advanced SSH Techniques for IoT Devices
Once you’ve got the basics down, you can explore some advanced SSH techniques to take your skills to the next level:
Using SSH Keys
SSH keys are like digital passports that allow you to authenticate without entering a password every time. Here’s how you can set them up:
- Generate a key pair on your Mac by running the command
ssh-keygen. - Copy the public key to your IoT device using the command
ssh-copy-id username@device_ip_address. - Test the connection by logging in without entering a password.
Tunneling with SSH
SSH tunneling allows you to securely transfer data between your Mac and the IoT device. This can be especially useful if you’re working with sensitive information. For example, you can use SSH tunneling to securely access a database on your IoT device.
Tools and Resources for SSH on Mac
There are several tools and resources that can make working with SSH even easier:
- Terminal: The built-in Terminal app on your Mac is all you need to get started with SSH.
- SSH Config Files: You can create a config file to store frequently used SSH settings, saving you time and effort.
- Third-Party Clients: If you prefer a graphical interface, tools like PuTTY (for Windows users) or MobaXterm can be great alternatives.
These tools can streamline your workflow and make managing your IoT devices a breeze.
Best Practices for Managing IoT Devices with SSH
Here are some best practices to keep in mind when managing your IoT devices with SSH:
- Regular Updates: Keep both your Mac and IoT devices up to date with the latest software and security patches.
- Backup Configurations: Always back up your device’s configuration files before making any changes.
- Monitor Activity: Keep an eye on SSH activity to detect any suspicious behavior.
By following these best practices, you’ll ensure that your IoT devices remain secure and reliable.
Conclusion: Take Control of Your IoT Devices
And there you have it—a comprehensive guide to SSH login for IoT devices on your Mac. From setting up SSH to troubleshooting common issues, you now have all the tools you need to manage your IoT devices with confidence.
So what are you waiting for? Go ahead and give it a try. And don’t forget to share your experience in the comments below. Who knows? You might just inspire someone else to take the plunge into the world of IoT and SSH.
Table of Contents
- What Is SSH and Why Should You Care?
- How to Set Up SSH on Your Mac
- Connecting to an IoT Device via SSH
- Common Issues and How to Fix Them
- Tips for Securing Your SSH Connection
- Advanced SSH Techniques for IoT Devices
- Tools and Resources for SSH on Mac
- Best Practices for Managing IoT Devices with SSH
Happy hacking, and remember—knowledge is power!